Zoom in and Zoom out in Excel allows users to adjust the view of their spreadsheets for better readability and navigation. By focusing on specific sections or increasing the overall view, users can effectively manage data presentation and analysis. With the Zoom in and Zoom out feature, users can scrutinize intricate details or get a broader perspective of their data, enhancing productivity and decision-making. Whether analyzing financial statements, creating charts, or designing reports, having the ability to adjust the zoom level ensures that users can work comfortably with varying amounts of data. This feature is particularly useful when dealing with large datasets or when working on complex projects that require detailed examination. By mastering Zoom in and Zoom out in Excel, users can optimize their workflow and make the most out of their spreadsheet experience, improving efficiency and accuracy in their tasks.
This Tutorial Covers:
- Zoom in and out using the keyboard and mouse together
- Shortcuts on the keyboard for zooming in and out
- Using the Ribbon to Adjust the Zoom Level
- Worksheet Zoom to 100%
- Zoom to Selection
- Using the Status Bar to adjust the Zoom Level
- When using touch screen, zoom in to zoom out
- Significant Details About Excel’s Zoom In and Zoom Out
1. Zoom in and out using the keyboard and mouse together:
An easy and efficient way to quickly zoom in and out of an Excel worksheet is to use a combination of your mouse and keyboard.
The steps to Zoom in and out using the keyboard and mouse together in Excel are described below:
Step 1: Select the worksheet you want to zoom in. Next, press and hold the Control key on your keyboard.
To zoom in, use the scroll wheel on your mouse and move it forward. For zooming out, move the scroll wheel backward.
As you use the scroll wheel, the worksheet will zoom in or out in increments of 15%.
You can check the current zoom level in the status bar.

By following these steps, you can easily adjust the zoom level of your Excel worksheet to improve visibility and analysis of your data.
2. Shortcuts on the keyboard for zooming in and out:
For those who prefer using keyboard shortcuts, Excel offers a quick way to zoom in and out using the following keyboard combinations:
- To Zoom-In, press Control + Alt + Plus Key.
- To Zoom-Out, press Control + Alt + Minus Key.
To use these shortcuts, simultaneously hold down the Control and Alt keys on your keyboard, and then press either the plus or minus key. Each press will change the zoom level by 15%. If you need to zoom in or out further, you can press the plus or minus key multiple times.
Please note that this keyboard shortcut only works if your keyboard has a numeric keypad. By using these keyboard shortcuts, you can easily adjust the zoom level in Excel without having to rely on your mouse.
3. Using the Ribbon to Adjust the Zoom Level:
If you know the exact zoom level you want to set for your Excel worksheet, you can use the Excel Zoom dialog box to specify it.
The steps to use the Ribbon to Adjust the Zoom Level in Excel are described below:
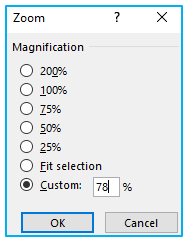
Step 1: First, click on the ‘View’ tab. under ‘Zoom’ section, click on the ‘Zoom’ option. The Zoom dialog box will appear as a result.

Step 2: Choose the magnification level from the predefined options or enter a custom value in the ‘Custom’ field option. click OK to apply it.

Alternatively, you can use the following keyboard shortcut to open the Zoom dialog box:
Press Alt + W + Q (one key at a time)
By using this Excel zooming feature, you can quickly and easily set the exact zoom level you need for your Excel worksheet, without having to rely on mouse or scroll wheel movements.
-
Worksheet Zoom to 100%:
If you have altered the worksheet’s zoom settings and wish to return to the default 100% zoom, you can do so by selecting the 100% option under the “View” tab.

As an alternative, you can use the keyboard shortcut shown below to zoom your spreadsheet to 100%:
ALT + W + J
-
Zoom to Selection:
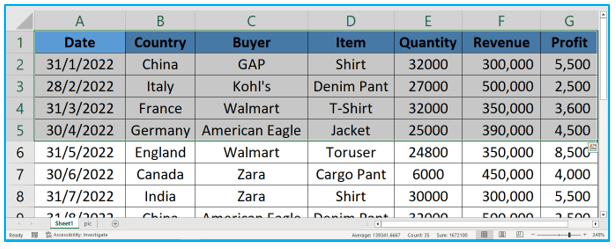
To zoom in completely to a selected data set in Excel, you can use the ‘Zoom to Selection’ option located in the “View” tab.
The steps to use “Zoom to Selection” feature to zoom in completely to a selected data set are described below:
Step 1: First, select the range of data that you want to zoom in on.

Step 2: Next, click on the ‘View’ tab and then click on the ‘Zoom to Selection’ option.

The result looks like below:

Alternatively, you can use the following keyboard shortcut to quickly zoom into the selection:
Press Alt + W + G (one key at a time)
By using this feature, you can quickly focus on a specific data set and analyze it in detail without the need to manually adjust the zoom level.
4. Using the Status Bar to adjust the Zoom Level:
The Status bar in Excel offers yet another handy method for zooming in and out.
How to Use the Status Bar to adjust the Zoom Level in Excel is shown below:
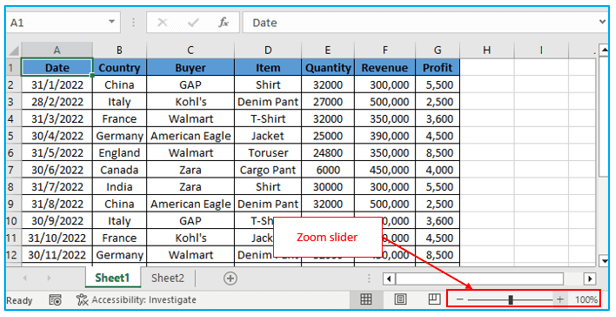
Step 1: You can zoom in and out by moving the zoom slider left or right, which is by default displayed at the right end of the Status bar.

Additionally, by clicking on the zoom percentage value, a dialog box will emerge, allowing you to choose a predefined zoom level or enter a custom value.
Simply right-click the Status bar and make sure these two choices are chosen if you cannot see the zoom slider or percentage value.

You may quickly and easily change the zoom level in Excel by using the Status bar instead of keyboard shortcuts or the Ribbon.
5. When using touch screen, zoom in to zoom out:
If your laptop or monitor has a touchscreen, you may instantly zoom in and out of Excel by making a few quick finger movements.
It can be used as follows:
To zoom in or out, place two fingers on the screen and slide them apart or closer together.
This gesture offers a quick and simple way to change the zoom level in Excel and is comparable to the pinch-to-zoom gesture used on smartphones and tablets.
6. Significant Details About Excel’s Zoom In and Zoom Out:
- You can choose a zoom level in Excel between 10% and 400%.
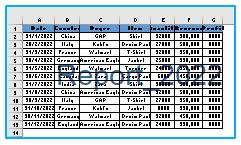
- If the named ranges on your Excel worksheet are zoomed in below 40%, you will be able to see the named range’s name in the range itself (as shown below).

- In Excel, only that particular worksheet is affected whether you zoom in or out. The other worksheets in the same workbook would all continue to be the same.
- You must first group the worksheets by choosing them all at once if you want to adjust the zoom levels for several worksheets in the same workbook at once. Hold the control key while clicking the sheet tab names to organize the worksheets. Additionally, keep in mind to ungroup the worksheets once you’re finished, as anything you do subsequently would affect all of the worksheets that are grouped.
This tutorial has covered several different methods for quickly adjusting the zoom level in Excel, including keyboard shortcuts, the zoom slider in the status bar, and the pinch-to-zoom gesture on touchscreen devices.
Additionally, we have explored various Zoom options available in the ribbon.
Application of Zoom in and Zoom out in Excel
- Data Detailing: Zoom in allows users to focus on specific cells or ranges, facilitating detailed examination of data.
- Formatting Check: Zoom out helps users review the overall formatting and layout of their spreadsheet.
- Chart Analysis: Zoom in enables closer inspection of chart elements for precise analysis and adjustments.
- Slide Creation: Zoom out assists in designing slides for presentations by providing a broader view of the spreadsheet.
- Screen Sharing: Zoom in helps highlight key data points during screen sharing sessions for clearer communication.
- Print Preview: Zoom out provides a comprehensive preview of the spreadsheet before printing, ensuring proper alignment and readability.
For ready-to-use Dashboard Templates:
