AutoCorrect option in Excel offers a valuable tool for improving accuracy and efficiency in your spreadsheets. By enabling AutoCorrect, common typing errors, misspellings, and repetitive tasks are automatically corrected or replaced, saving you time and reducing the risk of errors. Say goodbye to manual corrections and hello to seamless text entry with this essential feature. Whether you’re inputting formulas, labels, or text data, AutoCorrect in Excel ensures consistency and professionalism in your documents. Take control of your data entry tasks and enhance your Excel experience by leveraging the capabilities of AutoCorrect. With just a simple setting adjustment, you can optimize your workflow and minimize distractions, allowing you to focus on analyzing data and making informed decisions. Embrace the convenience and reliability of AutoCorrect option in Excel and elevate your spreadsheet skills to new heights of productivity and accuracy.
This Tutorial Covers:
- Understanding the Autocorrect Options
- Autocorrect Options Tab
- Autocorrect Exceptions
- Autoformat As You Type Tab
- Actions Tab
- Math Autocorrect Tab
- Autocorrect Options Tab
- How Can You Use Excel Autocorrect to Simply add Your Own Words
- Example 1- Use Autocorrect to Complete Abbreviations
- Example 2- Rapidly Insert sign (such as Degree or Delta)
- Example 3- Write Formulas Faster with Autocorrect
- How to Turn OFF Autocorrect Completely
- How to Replace/Disable Some Phrases from Autocorrection
- How to Undo Autocorrect Changes in Excel
1. Understanding the Autocorrect Options:
Autocorrect was developed to assist you in resolving any minor issues you might encounter when entering data into Excel. (such as replacing some commonly misspelled words with correct words).
Additionally, it gives you greater control when working with Excel. (as we will see in the examples later in this tutorial).
But first, let’s figure out where the autocorrect options are and what comes standard.
The following is a description of how to access the autocorrect options:
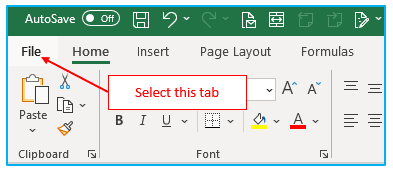
Step 1: Select “File” from the tabs.
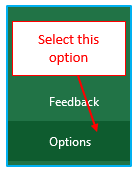
Step 2: Click “Options” on the File screen.
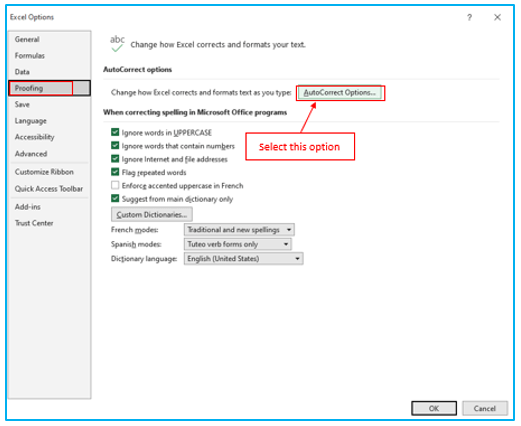
Step 3: Click “Proofing” in the “Excel Options” dialog window. Select “Autocorrect Options” under “Proofing” options.
The Autocorrect Options dialog window will appear as a result.
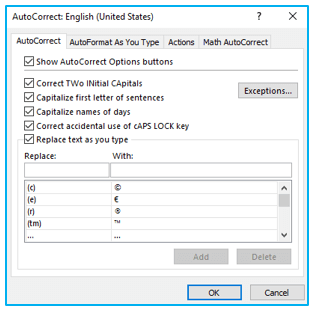
The Autocorrect dialog box’s various tabs and options will be explained in the next section.
-
Autocorrect Options Tab:
There are some options that are enabled by default in the “Autocorrect” Options tab that fix some prevalent problems.
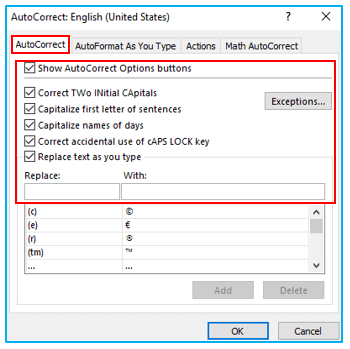
Show Autocorrect Options buttons:
This one is applicable to other MS apps but not Excel. You can see the autocorrect choices in Microsoft Word or Microsoft PowerPoint when this option is enabled.
Correct two initial capitals:
When enabled, this choice will cause Excel to instantly correct the two capital initials. For instance, if you type “MIcrosoft,” it will transform to “Microsoft” automatically.
Capitalize first letter of sentences:
When turned on, this setting makes sure a new sentence always begins with a capital character. if you type, “Hi. what are you doing?”, it will be autocorrected to “Hi. What are you doing?”.
Capitalize names of days:
If you enter in lowercase, this will instantly change the first letter of the day’s name. The word “saturday” would be altered to “Saturday,” for instance.
Correct accidental use of Caps lock key:
If you write a sentence while the Caps lock is active mistakenly, it will instantly correct the text and turn it off. For instance, if you type “mICROSOFT,” it will transform to “Microsoft” immediately.
Replace text as you type:
Excel already includes a few frequently misspelled terms here. (or short codes for some symbols). If you type (c), for instance, it immediately transforms into the copyright symbol. This is so that it can be seen that it is listed in the list for this choice. Words can be added to or taken out of the collection.
-
Autocorrect Exceptions:
Although these autocorrect options are fantastic, there are times when you might prefer it to not act incredibly intelligent and correct these automatically.
For instance, Excel would immediately change the brand name “ASd” (with the “d” in lower case) to “Asd”.
Even though you enjoy when autocorrect occurs in other situations, you can choose to ignore this one.
Select the “Exceptions” option under the “Autocorrect” tab.
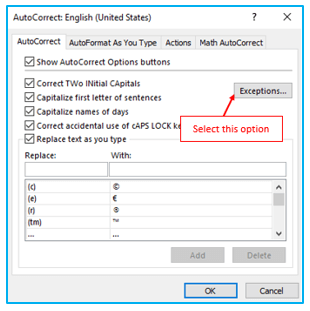
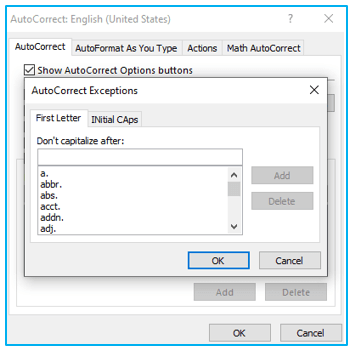
You can have two different kinds of exceptions in the Autocorrect Exceptions dialog box:
First Letter:
Excel capitalizes the alphabet after the semicolon by default. (dot). Here, you can list a few outliers. (A list of typical exceptions already exists.)
Initial Caps:
You can indicate here that you do not want “ASd” to be converted to “Asd”.
-
Autoformat As You Type Tab:
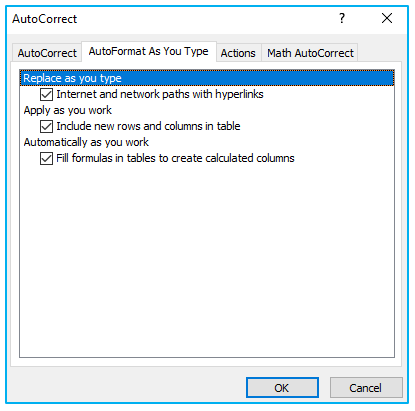
This menu offers three choices. (all of which are enabled). All three of these choices appeal to me.
Replace as you type:
Any hyperlinks you write in a cell will be automatically converted to links. I occasionally disable this choice because I frequently find myself clicking the cell, which opens the link in the browser after a brief delay.
Apply as you work:
When you input anything in the cell next to the one in the table, this will automatically add new rows and columns to an Excel table.
Automatically as your work:
This option will input the same formula (with adjusted cell references) into all of the cells in the column when you enter a formula in a column of an Excel Table.
-
Actions Tab:
You can make an action based on a specific word or text in Microsoft applications.
There is only one sort of action available in Excel, and that is a date action.
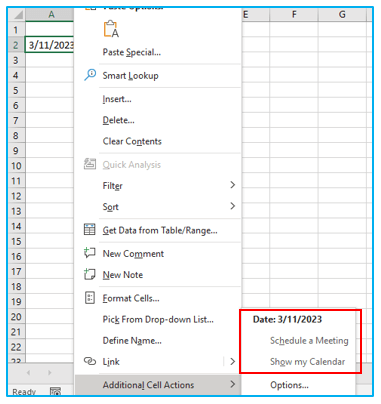
When you right-click on a date in an Excel cell with a date in it, you’ll see a list of possible options for that date. (for instance, display that date in the calendar or set up an appointment in Outlook.).
If you have a list of dates and want to rapidly save some in your calendar or want to set up a meeting, this might be helpful. (using Outlook).
You must activate this option in Excel in order to use it because it is disabled by default.
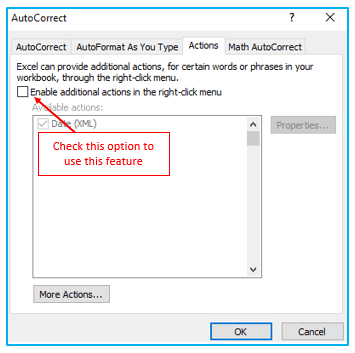
Once activated, Excel can be used with it. Simply right-click on a cell that contains a date to reveal the activities menu at the bottom.
-
Math Autocorrect Tab:
You can put math symbols in an equation just like you can in an Excel cell (such as Delta, Degree, or Checkmark).
Text on this tab is instantly translated into the appropriate math symbol. For instance, if you type \sigma, the σ symbol will be substituted in its position.
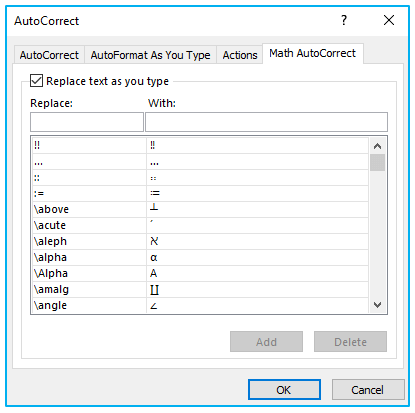
Please take note that the worksheet’s columns will not support this. Only equations will function with it.
2. How Can You Use Excel Autocorrect to Simply add Your Own Words?
Wouldn’t it be nice if some terms were included in autocorrect?
Say you want to add the term “hnugry” to autocorrect so that it changes it to “hungry,” for instance.
The following instructions can be used to add a word to autocorrect:
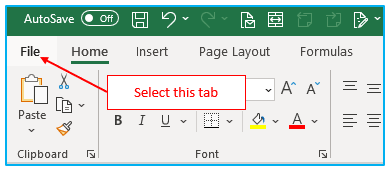
Step 1: Select “File” from the tabs.
Step 2: Click “Options” on the File screen.

Step 3: Click “Proofing” in the “Excel Options” dialog window. Select “Autocorrect Options” under “Proofing” options.
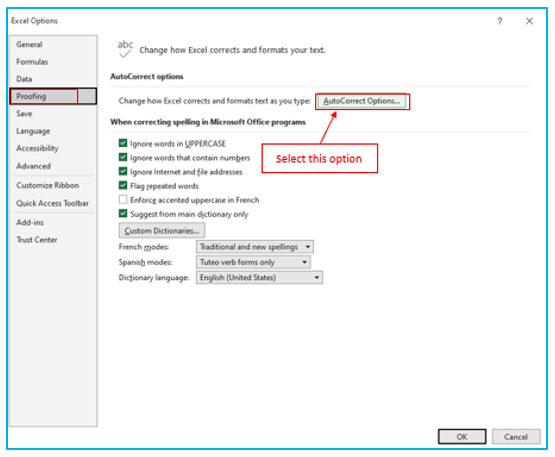
Step 4: Type the following in the Autocorrect dialog box:
Replace: hnugry
With: hungry
Click “ADD” after that. On the “OK” button, click.
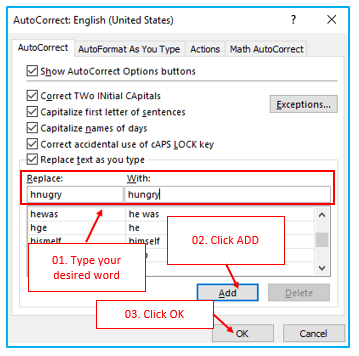
Excel will now autocorrect “hnugry” to “hungry” when you enter that word.
Here are a few things you should know about Excel’s autocorrect feature before I show you some cool instances of how to use it:
- Case distinctions in the autocorrect list. This indicates that you have inserted the word “hnugry,” which should be changed to “hungry” because it only functions with the lower case word. It won’t be fixed if you type “Hnugry” or “HNUGRY”.
- This modification is saved in Excel and would remain after closing and reopening the workbook. You must explicitly delete it if you decide you no longer want it.
- Other Microsoft products like Word or PowerPoint immediately activate an autocorrect that you specify in Excel.
To fix frequent writing mistakes, autocorrect was developed. However, there are some fantastic methods to use it as a time saver.
Here are a few helpful instances of how to use Autocorrect. (other than correcting a misspelled word).
-
Example 1- Use Autocorrect to Complete Abbreviations:
Imagine that you are employed by “ASD Cargo Limited”.
Your job requires you to manually type the entire company name numerous times throughout the day while working with Excel.
This would feel like a waste of time, regardless of how quickly you write.
Wouldn’t it be nice if there was a way to input ASD (or whatever you want) and Excel would automatically replace it with the name of the business?
This is where AutoCorrect’s brilliance comes in handy.
When using an acronym, Excel will instantly change it to the specified text if the acronym is specified in Autocorrect.
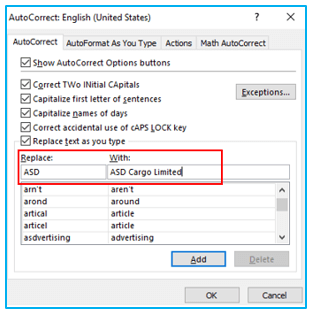
For instance, you can instruct Excel to substitute “ASD Cargo Limited” for the letter ASD whenever you write it.
Something like what is displayed below:

The autocorrect dialog box below illustrates what occurs when you add an autocorrect in Excel where ASD should be corrected to.
What if you only want to include ABC rather than the full name?
Simply press Control + Z to return to ABC if you don’t want the autocorrect to change ABC to the complete name.
It’s best to choose an acronym that you won’t likely use in your job when using Control + Z. This eliminates the possibility of you accidentally learning the complete name. (when all you wanted was the abbreviation text).
Here are some situations where using this autocorrect tip can be very time-efficient:
- You can rapidly enter file or folder names. (instead of copy-pasting it every time).
- If you have a list of your team, you can rapidly enter everyone’s names by using their initials.
A word of caution: Any autocorrect options you select in Excel are also activated in other Microsoft apps, such as Word or PowerPoint. It’s ideal to use abbreviations in these situations that you wouldn’t normally use.
-
Example 2- Rapidly Insert sign (such as Degree or Delta):
Some symbols in Excel are challenging to write or insert because they are not already on the keyboard. (such as the degree symbol or the delta symbol or bullet points).
You can either use the Insert Symbol dialog window or the keyboard shortcut, which are frequently lengthy and difficult to remember. (which is time taking).
You can use the Autocorrect feature to assign certain symbols a code name or abbreviation if you find yourself using them frequently.
Now, whenever you need to enter that sign, all you have to do is type the code name; the symbol will be autocorrected.
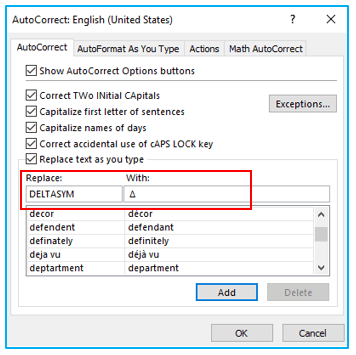
The Excel delta symbol is obtained using the code DELTASYM in the sample below.

Make the following adjustment in the Excel Autocorrect dialog window to achieve this:
-
Example 3- Write Formulas Faster with Autocorrect:
This trick may seem fanciful, but it can save you time if you frequently deal with lengthy formulas or the same formula repeatedly.
Here is a formula that will instantly insert a serial number into the cell where it is used:
=IF(ISBLANK(B2),””,ROW()-1)
If you frequently need to make a formula like this, it is preferable to turn it into a short code that you can use in Autocorrect.
In order to obtain the formula in this instance, I used the autocorrect code “autosl”.
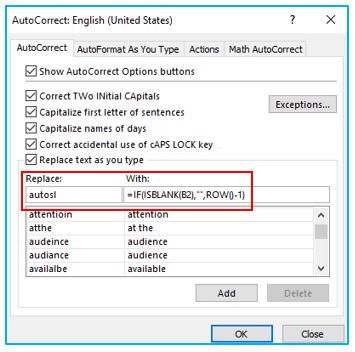
Now, you can quickly enter the full formula using the code “autosl” (as shown below):

Note: Although most of you won’t ever need it, as I already stated, it’s still a useful trick to be aware of. (just in case). The case mentioned above is an actual situation that I’m using to speed up one of my tasks right now.
3. How to Turn OFF Autocorrect Completely?
Even though I think autocorrect is a fantastic tool, not everyone may find it useful.
And occasionally, it might even irritate you. For instance, Excel autocorrect will instantly change the text (into or ® or TM) if you type (c) or (r) or TM.
It’s best to disable autocorrect in such circumstances, or at the very least, remove the words you don’t want to autocorrect.
The steps to disable autocorrect are as follows:
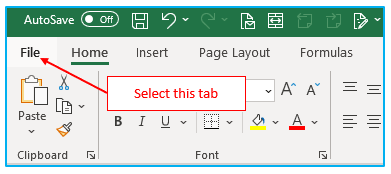
Step 1: Select “File” from the tabs.
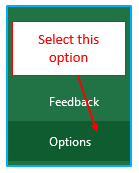
Step 2: Click “Options” on the File screen.
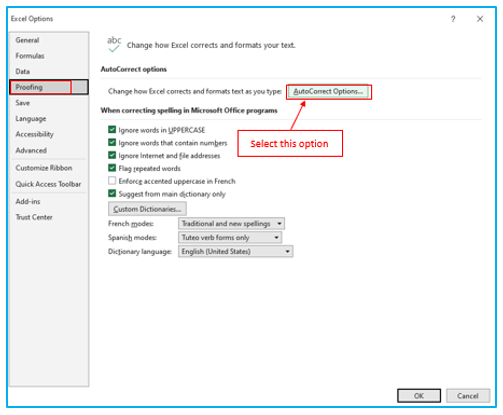
Step 3: Click “Proofing” in the “Excel Options” dialog window. Select “Autocorrect Options” under “Proofing” options.
Step 4: Uncheck “Replace text as you type” in the “Autocorrect” tab of the “Autocorrect” dialog box.
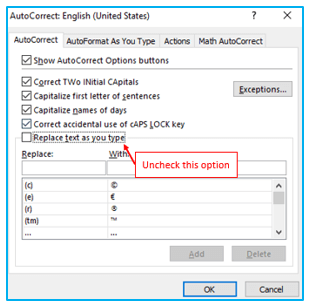
Note: The autocomplete feature, which replaces some text with the specified text, would be entirely disabled by the aforementioned steps. These frequently misspelled terms might no longer be fixed as a result of this.
4. How to Replace/Disable Some Phrases from Autocorrection?
You can locate the word in the list and manually delete it if you want to retain the “Replace text as you type” feature generally but want some exceptions. (or edit it).
The procedures are as follows:
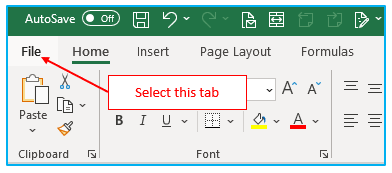
Step 1: Select “File” from the tabs.
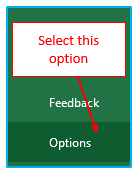
Step 2: Click “Options” on the File screen.
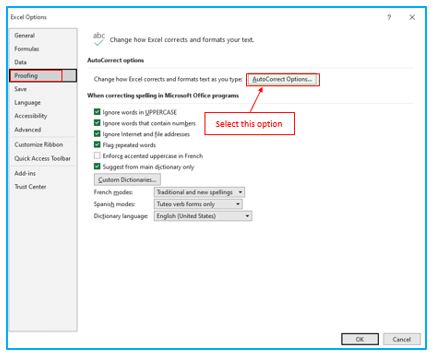
Step 3: Click “Proofing” in the “Excel Options” dialog window. Select “Autocorrect Options” under “Proofing” options.
Step 4: Select the phrase you want to remove from the “Autocorrect” dialog box’s “Autocorrect” tab. Press the “Delete” key.
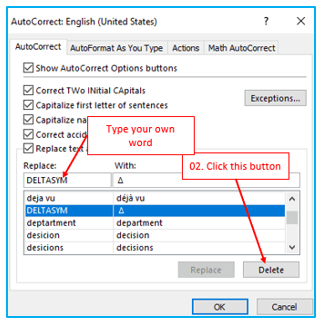
The same method can be used to change a phrase in “Autocorrect”.
5. How to Undo Autocorrect Changes in Excel?
By pressing Control + Z, you can restore the original text if Excel’s autocorrection alters what you’ve written.
For instance, Excel immediately changes the letter ASD you type into “ASD Cargo Limited” when you press the space bar after doing so.
However, if you press Control + Z right now, it will return to being an ASD and stay that way.
Although most users won’t ever need to modify the function of Autocorrect in Excel, it’s still a good idea to be aware of some time-saving strategies you can employ. (as shown in the examples).
Application of AutoCorrect option in Excel
- Correct Common Typos: AutoCorrect automatically fixes frequent typing errors and misspellings as you type, ensuring clean and accurate text entry.
- Standardize Text Entries: Ensure consistency in your documents by automatically replacing specific abbreviations or acronyms with their full forms or standardized terms.
- Streamline Data Entry: Save time by using AutoCorrect to expand short codes or abbreviations into longer text strings, reducing repetitive typing tasks.
- Fix Case Errors: Automatically correct the capitalization of proper nouns or the first letter of sentences, maintaining a professional appearance in your spreadsheets.
- Custom Corrections: Create custom AutoCorrect entries to automatically replace frequently used phrases or technical terms, streamlining your workflow and improving efficiency.
- Prevent Errors in Formulas: Use AutoCorrect to fix common mistakes in formula entry, such as correcting “SUME” to “SUM”, ensuring your calculations are accurate and error-free.
For ready-to-use Dashboard Templates:
