Move rows and columns in Excel effortlessly and streamline your data management process! Whether you’re reorganizing a large dataset, compiling reports, or simply trying to make sense of your numbers, understanding how to efficiently move rows and columns is crucial. This guide will walk you through the necessary steps to rearrange your data smoothly, ensuring that your spreadsheets remain both functional and visually appealing. Master the art of manipulating rows and columns in Excel and transform your data handling experience with ease.
In this guide, we’ll explore several methods for moving rows and columns in Excel, including drag and drop, cut and paste, and keyboard shortcuts.
Simply cutting and pasting or pressing the shortcut keys Ctrl + X and Ctrl + V, which you may already be accustomed to using while working in Excel, MS Word, or other programs, will move the rows and columns in Excel.
However, there are additional techniques to move columns and rows. Continue reading to learn how to change columns and rows in Excel by copying and pasting, as well as another method using sample images.
This ‘Move Rows and Columns’ Tutorial Covers:
- Move Rows in Excel
- Moving rows by mouse drag
- Important thing to know about this method
- Moving rows by short keys
- Moving rows by mouse drag
- Move Columns in Excel
- Moving columns by mouse drag
- Important thing to know about this method
- Moving columns by short keys
- Moving columns by mouse drag
- Move Rows in Excel:
Assume I wish to relocate the highlighted row to the fourth row in the dataset below:
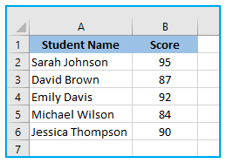
- Moving rows by mouse drag:
Use the mouse to move a row to the desired spot
Step 1: Choose the row that needs to be moved.
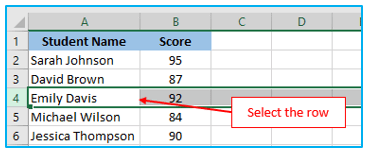
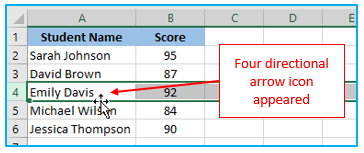
Step 2: Keep pressing the Shift key on your keyboard. Your cursor should now be at the selection’s edge. The move icon would appear (a four directional arrow icon).
Step 3: While continuing to hold down the shift key, click on the edge (with the left mouse button). Put it in the row where you wish to relocate this row. When you see a bold line directly beneath the row you want to move, release the mouse button.
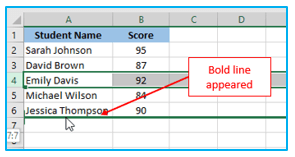
Step 4: Remove the Shift key (remember to keep the Shift key pressed till the end). After that, the result looks like below:
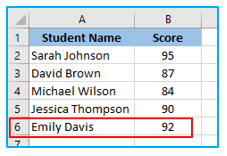
Keep in mind that I simply relocated the selected row in this example.
Selecting multiple rows and then taking the same actions will allow you to move multiple rows.
- Important thing to know about this method:
Here are some critical details concerning this approach:
- You can move adjacent excel row (or some cells from the contiguous rows). Non-contiguous rows cannot be moved in this way. For instance, moving rows 4 and 6 simultaneously is not permitted. However, choosing it allows you to shift rows 5 and 6 simultaneously.
- Using this technique, moving a few cells in a row or column won’t affect any other information in the worksheet. In the aforementioned example, any data outside of this table (i.e., above, below, or to the right, or to the left) is unaffected.
- Moving rows by short keys:
To move the rows, you can also use keyboard shortcuts.
Step 1: As in the example before, select the rows you wish to shift. I chose rows 2 and 3.
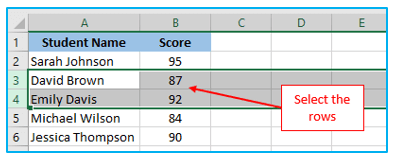
Step 2: Press Ctrl + X (Windows) or Command + X (Mac users). Press Ctrl + V or Command + V on the first cell of the 7th row, which is A7 for our demonstration.
The result looks like below:
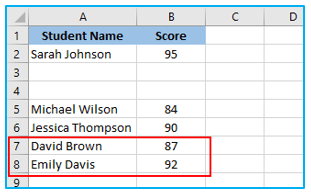
Keep in mind that I simply relocated the selected row in this example.
Selecting the multiple rows and then taking the same actions will allow you to move the multiple rows.
Here are some critical details concerning this approach:
- In this method, you have to move rows in blank cells.
- In this method, you can’t put another row on top of one row like “Moving rows by mouse drag” method. If you do this, then it will be override.
2. in Rows and Columns method Move Columns in Excel:
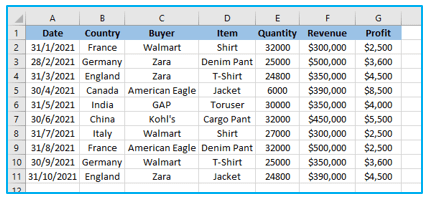
Moving columns in Excel can also be done using the same method. Assume you have a dataset like below:
- Moving columns by mouse drag:
How to move columns in excel is shown below.
Step 1: Choose the column (or adjacent columns) you want to relocate.
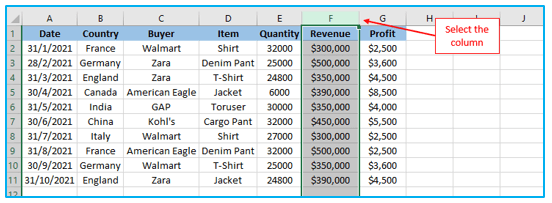
Step 2: Keep pressing the Shift key on your keyboard. Your cursor should now be at the selection’s edge. The move icon would appear (a four directional arrow icon).
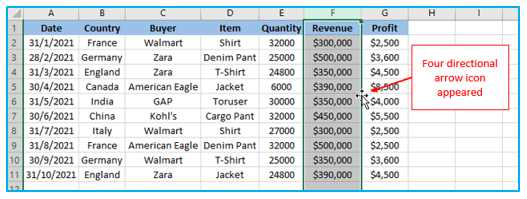
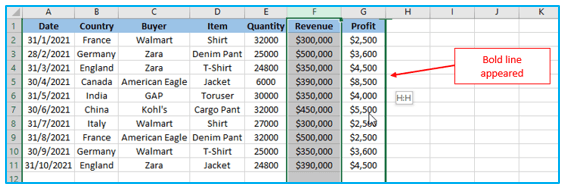
Step 3: While continuing to hold down the shift key, click on the edge (with the left mouse button). Place it in the column to which you wish to shift this row. When you see a bold line at the edge of the column where you wish to relocate this column, release the mouse button.
Step 4: Remove the Shift key (remember to keep the Shift key pressed till the end). After that, the result looks like below:
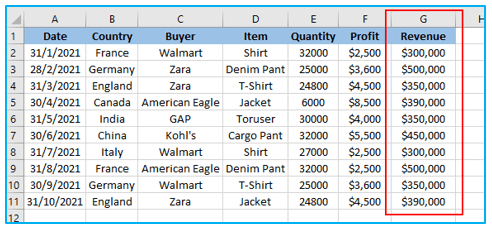
Keep in mind that I simply relocated the selected column in this example.
Selecting the multiple columns and then taking the same actions will allow you to move the multiple columns.
- Important thing to know about this method:
Excel copies the content and any formulas when shifting columns, which results in moving values, hidden cells, and cell formats.
Cell references will not be changed, though. The column references must be manually changed.
- Moving columns by short keys:
To move the excel column, you can also use keyboard shortcuts.
Step 1: As in the example before, select the rows you wish to shift. I chose column F.
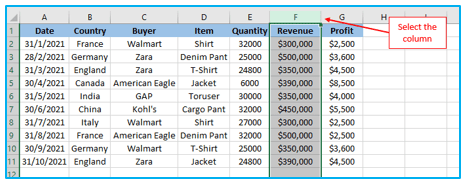
Step 2: Press Ctrl + X (Windows) or Command + X (Mac users). For our demonstration, press Ctrl + V or Command + V on the F column.
The result looks like below:
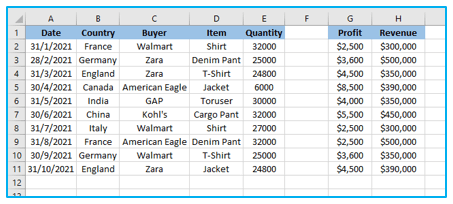
Keep in mind that I simply relocated the selected column in this example.
Selecting the multiple columns and then taking the same actions will allow you to move the multiple columns.
Here are some critical details concerning this approach:
- In this method, you have to move columns in blank cells.
- In this method, you can’t put another row on top of one row like “Moving columns by mouse drag” method. If you do this, then it will be override.
For ready-to-use Dashboard Templates:
