Radio Buttons in Excel are a dynamic and user-friendly tool for enhancing interactive decision-making and data entry in your spreadsheets. Whether you’re creating a survey, setting up a dynamic form, or building an interactive dashboard, radio buttons can streamline the process by providing a clear and straightforward way for users to make single-choice selections. This guide will take you through the steps to insert and effectively use radio buttons in Excel, ensuring your spreadsheets are not only functional but also intuitive and engaging. By incorporating this interactive element, you’ll elevate the user experience and add a professional touch to your data-driven projects.
I’ll explain how to put radial buttons in Excel in this tutorial. You’ll discover how to combine and remove them as well.
This Tutorial Covers:
- Get Excel’s Ribbon’s Developer Tab
- Excel’s Radio Button Insertion Procedure
- Excel Add Multiple Radio Buttons
- Method 1: Using the Developer Tab to Insert the Radio Buttons
- Method 2: Pasting the radio buttons in Excel
- Method 3: Drag Cells and Fill Them With Radio Buttons
- Excel formula for grouping radio buttons
- Excel’s deletion of radio buttons
- How to Correct the Location of a Radio Button in Excel
- Turn on radio buttons in an Excel protected sheet
- Things to Keep in Mind
- Checkbox vs. Radio Button
1. Get Excel’s Ribbon’s Developer Tab
One of the most important criteria when inserting radio buttons in Excel is this. Excel does not have the Developer ribbon activated by default. When necessary, you can directly enable it. There are choices for Macros, VBA, Add-ins, and XML under the Developer tab.
The steps to get Developer tab in Excel’s Ribbon are described below:
Step 1: Select “Customize the Ribbon” by performing a right-click on any of the currently active sections in the ribbon. The “Excel Options” dialog window appears.

Step 2: “Customize the Ribbon” choices are available in the “Excel Options” dialogue window. Check the “Developer” choice in the “Main Tabs” pane on the right. Select OK.
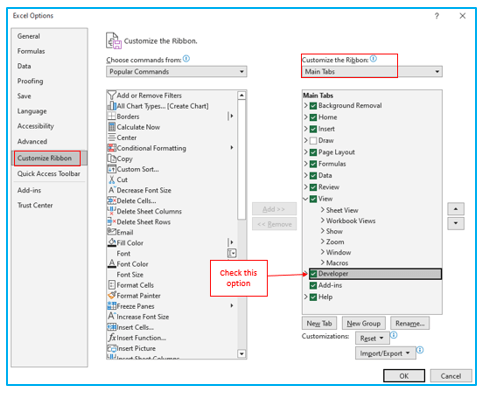
As a result, the “Developer” tab will show up as one of the ribbon’s tabs.

You now have access to a number of interactive controls because the developer tab is accessible. Now that we have that radio option in place, let’s move on.
2. Excel’s Radio Button Insertion Procedure
Step 1: Go to “Developer” Tab. Under “Controls” section click “Insert”, then choose “Option Button” from “Form Controls” group.
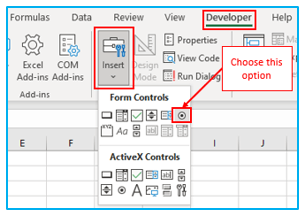
You would observe that interactive controls come in two varieties: form controls and interactive controls. Interactive controls can also be used in user forms, whereas Form Controls are only intended for use in Excel Workbooks. Interactive controls offer a great deal more freedom and have a wide range of features. We will only be concentrating on the Form Control Radio Button (also known as the Option Button) in this lesson.
Step 2: Anywhere on the worksheet, use the cursor to point. You’ll spot a plus sign (instead of the regular cursor). There will be a radio button inserted wherever you click.
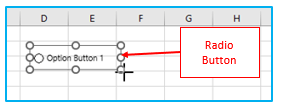
Congratulations! You’ve added a radial Button Excel. You can verify it by clicking the button. There is just one little issue, though. This radio button does nothing right now, so it is pointless. This must be linked to a worksheet column in order to function. You won’t be able to record the answer (whether a person chooses option 1, option 2, or option 3…) until after that.
Step 3: Right-click on this radio icon and choose “Format Control” to customize it.
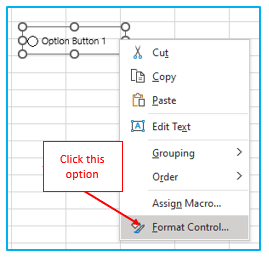
Step 4: Make the following adjustments in the Control menu of the “Format Control” dialogue box:
- Value: Checked (this makes sure that the radio button is checked by default when you start the workbook) (this makes sure that the radio button is checked by default when you open the workbook).
- Cell Link: $A$1 (this is the cell connected to the radio button) (this is the cell linked to the radio button). You can type this in directly or get the reference by choosing the cell.
Select OK.
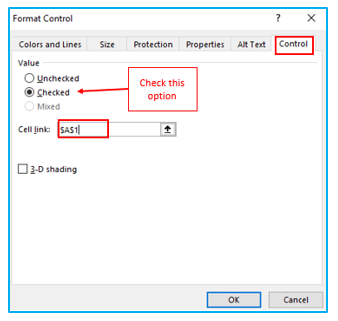
Step 5: Your radio button is currently connected to cell A1. A1 cell will display 1 when the radio button is selected.

The radio button’s chosen number is the one you can see in cell A1 (the linked cell). If there are numerous radio buttons, selecting the second one will display 2 in cell A1.
You can only choose one radio button when using a radial button, unlike selections in Excel. As a result, if there are multiple radio buttons, you can only pick one of them (you can, however, group sets of radio buttons, covered later in this tutorial).
You need more than one radio button in the spreadsheet in order to use radio buttons in Excel. Let’s examine how to add several radio buttons to Excel.
3. Excel Add Multiple Radio Buttons
There are three different methods to insert multiple radio buttons to an Excel worksheet. They are covered in the following part.
- Method 1: Using the Developer Tab to Insert Radio Buttons
The simplest method is to place the radio buttons using the developer tab (as shown above). You can use as many radio buttons as you’d like by repeating the procedure as many times as you like.
When only a few radio buttons need to be added to Excel, this can be the method of option.
It’s fascinating to notice that if you link the first radio button with a worksheet cell, all subsequent radio buttons you insert will also be linked to that cell. Additionally, you will only be able to select one radio button.
- Method 2: Pasting the radio buttons in Excel
Copying and pasting an existing radio button is a quick method to insert a radio button. Simply choosing the radio button and hitting Control + D will accomplish this.
This would duplicate the current radio button.
When using this technique, you should keep the following in mind:
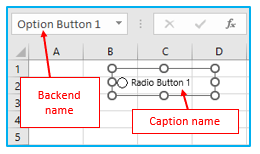
- When you copy and paste an existing radio button, the background name (the name Excel uses to identify that object) stays the same, but the caption name (the text that appears to the right of the radio button) is duplicated. To understand the distinction between the caption name and background name, see the picture below.
- All copied radio buttons would be attached to the same worksheet cell if the original radio button is connected to that cell.
- Method 3: Drag Cells and Fill Them With Radio Buttons
A duplicate of the radio button is also created when you copy and paste a cell that has one.
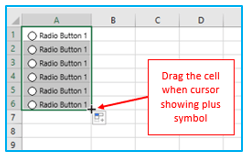
Similar to this, when you drag and select the cell that contains a radio button (as shown below) will duplicate the radio button in that cell.
The same guidelines as before applying to these as well:
- The caption name—the text that appears to the right of the radio button—of the radio button is copied when you copy and paste (or drag) a column that already contains the radio button, but Excel’s reference to the object—its background name—changes.
- All copied radio buttons would be attached to the same worksheet cell if the original radio button is connected to that cell.
4. Excel formula for grouping radio buttons
Consider a survey with ten distinct topics. You may select only one response for each query (by clicking on the radio button for that answer). As a result, you would pick ten radio buttons in the survey.
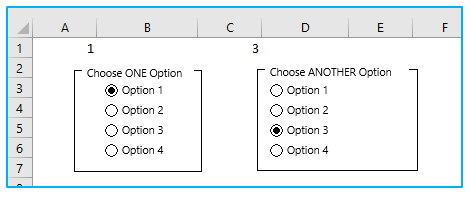
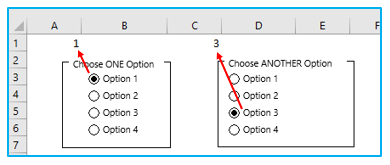
In order to make such a survey in Excel, the options would need to be grouped with radio buttons so that within a group, you could select only one option while simultaneously checking the radio button of another group.
Something like what is displayed below:
Step 1: Add each and every radio button you want to group.
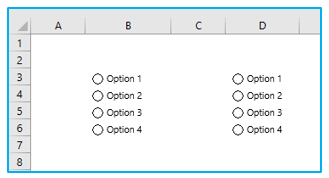
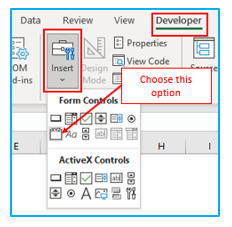
Step 2: Go to “Developer” Tab. Under “Controls” section click “Insert”, then choose “Group Box (Form Control)”.
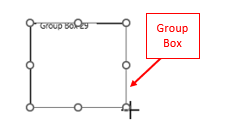
Step 3: Anywhere on the worksheet, use the cursor to point. You’ll spot a plus sign (instead of the regular cursor). There will be a group box inserted wherever you click.
Step 4: Place the group box so that it contains all of the radio buttons you want to group. The group box and the radio buttons can be resized and moved like any other object. Also rename the group box as your desired.
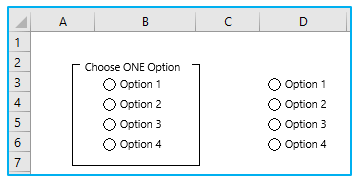
Step 5: Connect one of the radio buttons to a worksheet cell. The same cell would be immediately associated with all of the radio buttons.
- To make another group of radio buttons, follow the same procedure as before.
- You can choose an option from various groups separately in this manner, and the selections will be reflected in the referenced cell.
5. Excel’s deletion of radio buttons
In Excel, selecting a single radio button and hitting the delete key will quickly remove it. You must press the left mouse button while holding down the Control key to select a radio button.
Multiple radio buttons can be deleted as follows:
- Select all of the items you want to remove while holding down the Ctrl key.
- Simply press the Delete key to delete the multiple radio buttons.
If your worksheet contains a lot of radio buttons that are dispersed, you can get a summary of them all and delete them all at once using the following method:
Step 1: Go to “Home” tab. Under “Editing” section, select “Find & Select”. After that, choose “Selection Pane”.
This will launch a “Selection” pane and display a list of all the worksheet’s objects (including radio buttons, checkboxes, shapes, and charts).
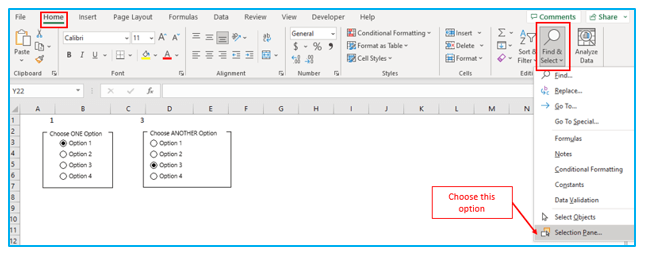
Step 2: Press the delete key after choosing the radio button you want to remove (to select more than one radio button, hold down the control key while selecting).
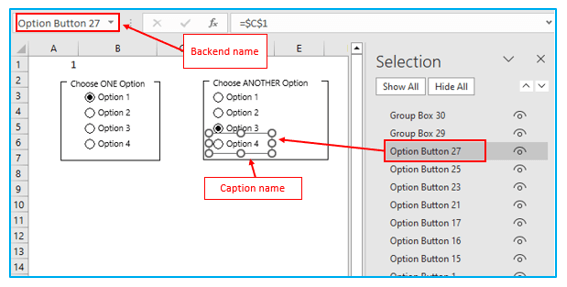
Keep in mind that the radio button names displayed here are the backend names and not the caption names.
Note: Be aware that only the current worksheet’s objects are shown in the selection pane.
6. How to Correct the Location of a Radio Button in Excel
The fact that shapes and radio buttons are affected when cells are resized or rows or columns are hidden or deleted is a frequent problem with using shapes and objects in Excel.
As demonstrated below:

When you resize or delete cells, do the following to halt the radio button from moving:
Step 1: Select “Format Control” by selecting the radio option with a left click.
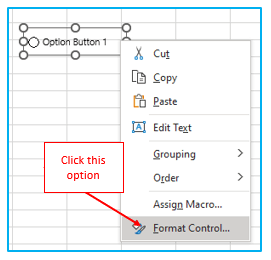
Step 2: The “Properties” tab should be selected in the “Format Control” dialogue window. Choose “Don’t move or size with cells” under “Object positioning” on the “Properties” tab. Select OK.
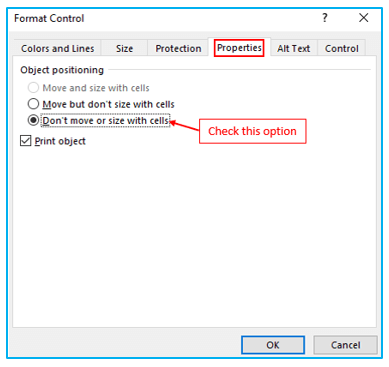
Now, the radio icon would remain in place when cells were resized or deleted.

7. Turn on radio buttons in an Excel protected sheet
Here are the steps to take if you want to protect the full worksheet but still use the radio buttons:
Step 1: Select “Format Cell” by performing a right-click on the cell that is associated with the radio button.
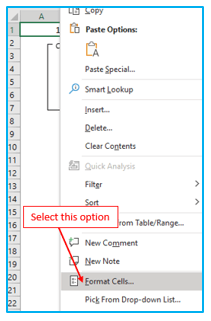
Step 2: Go to the “Protection” tab in the “Format Cells” dialogue window and uncheck the “Locked” box. Select OK.
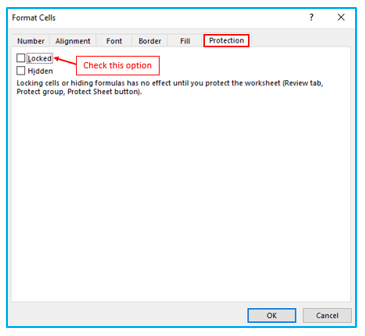
Now, the radio button would continue to function even if you protected the full sheet. Having the linked cell unlocked still makes it function because Excel only protects the locked cells.
8. Things to Keep in Mind
- It is listed as a type of interactive tool for Excel. It is easy to use and doesn’t call for Excel knowledge.
- To create a dynamic chart, you can also use the option or radio buttons.
- Excel’s option buttons make it simple to make your own inspector multiple-choice questionnaires.
9. Checkbox vs. Radio Button
Although the checkbox and the radio button have a comparable appearance, there are a few differences that you should be aware of before using them.
A radio button enables a user to choose just one option from a group of radio buttons. This implies that if there are gender radio buttons, you can only choose one of the categories.
A checkbox, on the other hand, is independent of other checkboxes and allows you to select numerous items at once. You can choose from a variety of abilities, for instance, when taking a skill assessment survey.
Here is Wikipedia’s description of a radio button, which also discusses how it differs from a checkbox.
“A graphical control element known as a radio button or option button enables users to select just one option from a preset list of mutually exclusive choices. A checkbox, which enables more than one (or no) object to be selected and for the unselected state to be restored, is different from a radio button due to its singular property”.
For ready-to-use Dashboard Templates:
