On the first day of my job in a small consulting company, I was staffed on a short project for three days.
The task was easy.
On the network disk, there were many folders, each containing hundreds of files.
I had to take the following three actions:
Step 1: Copy the file’s name after selecting it.
Step 2: In Excel, paste that name in a column and press Enter.
Steps 1 and 2 should be repeated for the next file.
Sounds easy, doesn’t it?
It was time-consuming and simplistic.
If I had known the proper methods, I could have completed what took me three days in a matter of minutes.
This tutorial will demonstrate various methods to simplify and expedite the entire process which makes this possible, with or without VBA, making it both fast and easy.
This Tutorial Covers:
- Using Power Query Editor feature
- Using Find & Replace feature
- Using VBA code get a list of all the file names from a folder
- Using VBA code get a list of all the file names with a specific extension
- Using Power Query Editor feature:
The steps to find the files names list in excel using Power Query Editor feature are described below:
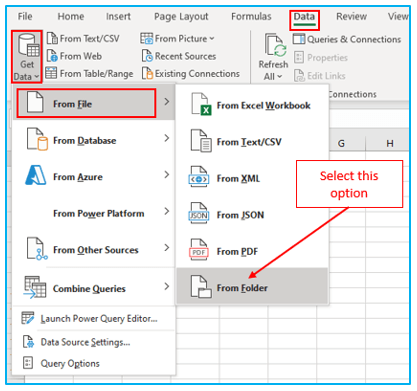
Step 1: Choose “Get Data” under “Get & Transform” by going to the “Data” option in the ribbon. After that, select “From File” from the menu, then click “From Folder” from the list of options.
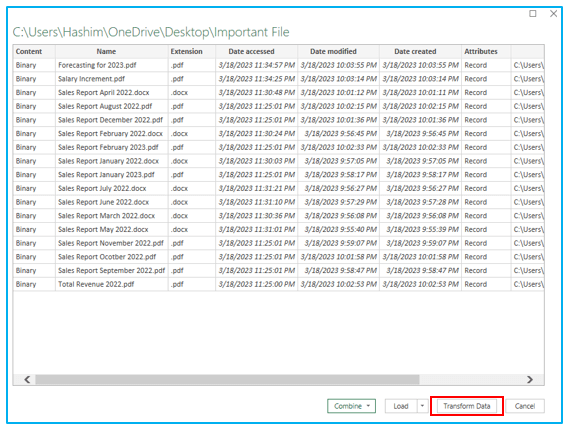
Step 2: Include the parent folder’s folder path that you want to ask for. You can either use the Browse option to choose the folder or copy and paste this from the address bar of the Windows file explorer. After entering the file path, it will show something like the below:

Step 3: You can verify the result to make sure it’s in the right folder by looking at the preview that will appear. To change the query, click the “Transform Data” button. You can choose to edit the files if you want to see more details about them. If not, you can “Load” the query without making any changes.
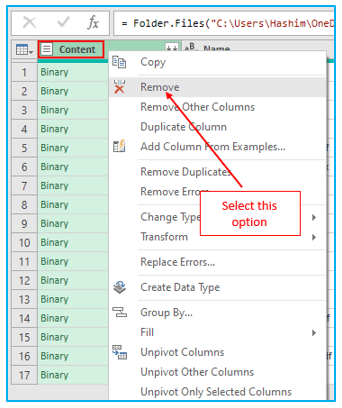
Step 4: You don’t need this column titled “Content” if all you’re after is a summary of the file names from the folders. You can transfer data into this column from numerous files and folders.
To remove the “Content” column, right-click on the column heading and pick “Remove” from the menu.
Step 5: We can view more specific details about the files by expanding the Attributes column. In the absence of that, we will only be able to see the Folder Path, Name, Extension, Date accessed, Date modified, and Date made, which may be all you need to see.
On the “Attributes” section, left click on the filter icon.
The various file characteristics you want to appear in the query results can be selected or deselected.
If you don’t want your new attribute columns to be prefixed, uncheck “Use original column name as prefix.” (ie. Attributes.Kind)
Click the “OK” option.
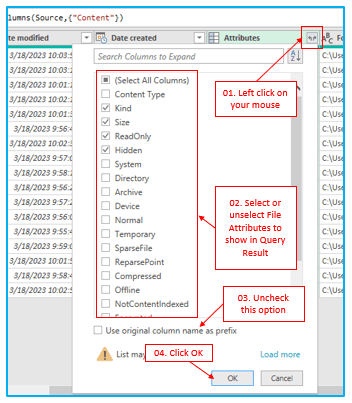
The additional categories you selected will now be visible in the query editor preview.
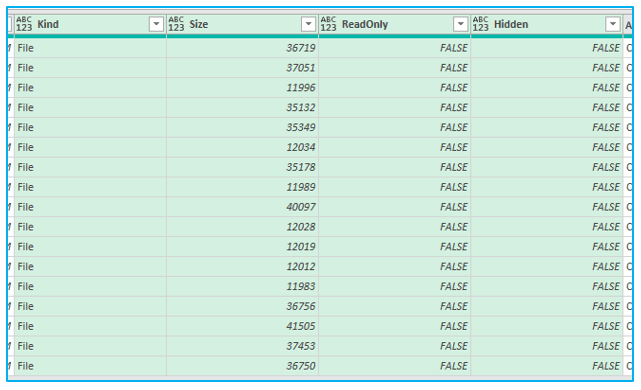
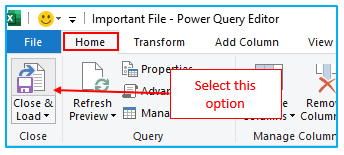
Step 7: Press the “Close & Load” option from the “Home” tab.
A table with details on all the files in your selected subdirectory will appear after the query has loaded. Then, you can filter this table to focus on specific file types, or you can sort on dates to locate a file’s most current version.
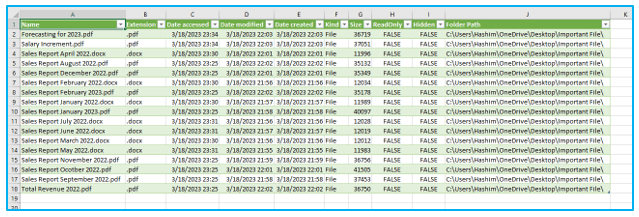
Through this method, you can get a list of file names as well as any additional information you desire.
2. Using Find & Replace feature:
The steps to find file name list in excel using Find & Replace feature are described below:
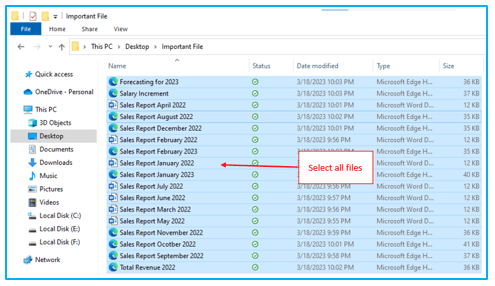
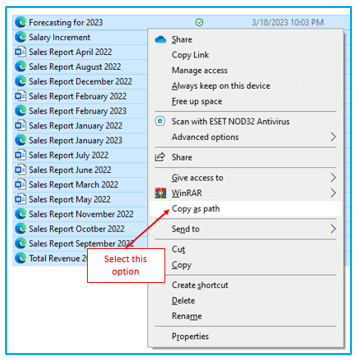
Step 2: Holding the Shift key, right-click while hovering over your choice. Holding the Shift key while performing a right press is important. Select “copy as path” in the pop-up box. This transfers all of the files’ file paths to the Clipboard.
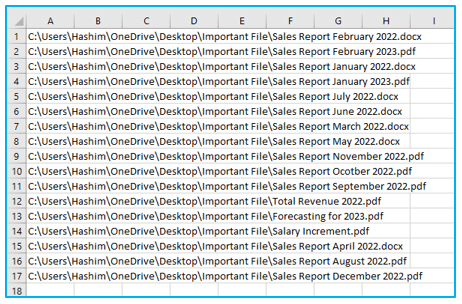
Step 3: Paste the file paths to your desired sheet in Excel.
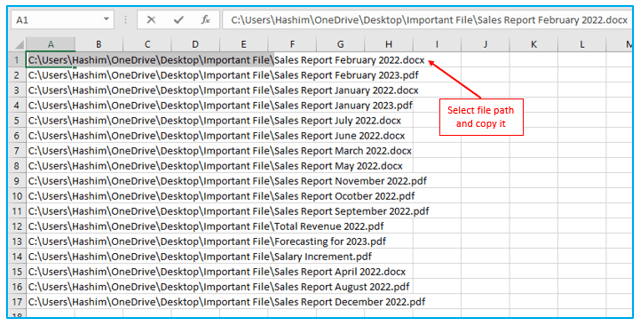
Step 4: Using Excel’s replace feature; we’ll get the filenames and remove the folder path.
So, select and copy the folder path by double-clicking on one of the cells.
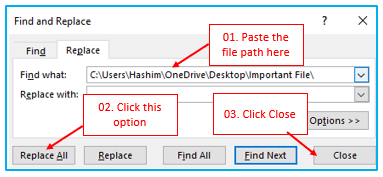
Step 5: Press CTRL+H to open “Find and Replace” dialog box. Click on “Replace” option and paste the folder path in the “Find what” box. Then click on “Replace All”. Click on “Close”.
The result looks like below:
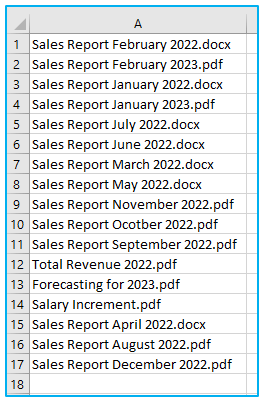
Through this method, you can find files name list from folder can be copied here in Excel.
3. Using VBA code get a list of all the file names from a folder:
This approach can be used if you’re comfortable using VBA.
Let me now give you the VBA code to build the function that will return a list of all the file names from an Excel folder.
Function GetFileNames(ByVal FolderPath As String) As Variant
Dim Result As Variant
Dim i As Integer
Dim MyFile As Object
Dim MyFSO As Object
Dim MyFolder As Object
Dim MyFiles As Object
Set MyFSO = CreateObject(“Scripting.FileSystemObject”)
Set MyFolder = MyFSO.GetFolder(FolderPath)
Set MyFiles = MyFolder.Files
ReDim Result(1 To MyFiles.Count)
i = 1
For Each MyFile In MyFiles
Result(i) = MyFile.Name
i = i + 1
Next MyFile
GetFileNames = Result
End Function
GetFileNames will be created by the aforementioned code and made available for use in the spreadsheets. (just like regular functions).
Where to save this code?
To copy this code into the VB Editor, follow the instructions below:
Step 1: Press ALT+F11 to open VB Editor. Right-click any spreadsheet object you’re working in in the VB Editor, select “Insert”, and then select “Module”. Press the “R” key while holding down the Control key if you can’t see the Project Explorer.
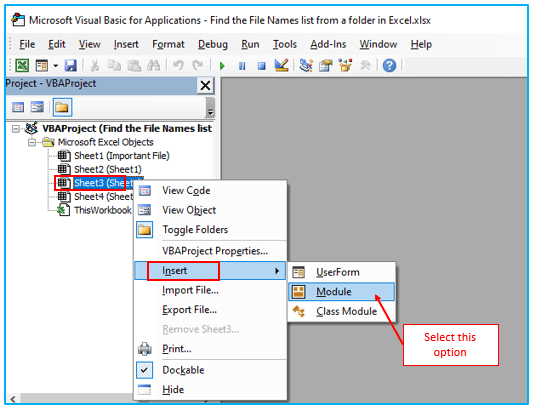
Step 2: To put the aforementioned code into the module code window, double-click the Module object.
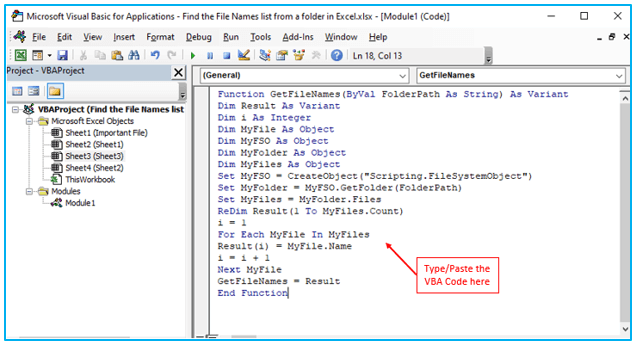
How Should This Function Be Used?
The methods to use this function in a worksheet are as follows:
Step 1: The folder address of the folder from which you want to display the file names should be entered in any cell (I’m entering it in column E1).
Enter the following formula (I’m entering it in column A2) in the cell where you want the list to appear:
=IFERROR(INDEX(GetFileNames($E$1),ROW()-1),””)
To obtain a list of all the files, copy and paste the formula into the columns below.
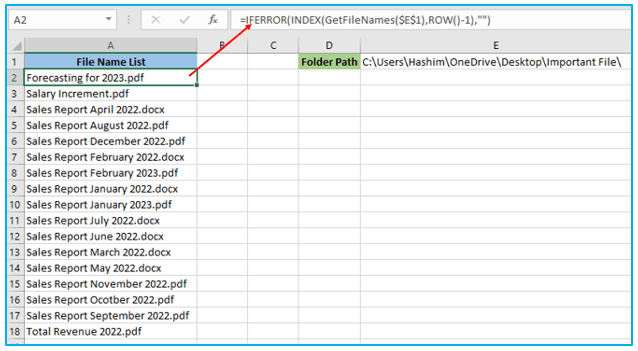
Take note that I used that cell in the GetFileNames formula after entering the folder address in another cell. The folder location can also be hard coded in the formula, as shown below:
=IFERROR(INDEX(GetFileNames(“C:\Users\Hashim\OneDrive\Desktop\Important File\”),ROW()-1),””)
In the method above, we used ROW()-1 and worked our way up to the second row. This ensured that the formula would be increased by 1 as I copied it into the columns below. You can just use ROW() if you’re putting the formula in the first row of a column.
How does this formula work?
This formula utilizes a combination of Excel functions to extract file names from a folder and list them in a column in Excel.
First, the GetFileNames formula is used to retrieve an array of all the file names in the folder.
Next, the INDEX function is used to display one file name per cell in a column, starting from the first file name in the array.
Finally, the IFERROR function is used to replace any #REF! errors with a blank cell when there are no more file names to list.
To summarize, this formula extracts file names from a folder and lists them in a column in Excel, while handling any errors that may occur during the process.
4. Using VBA code to get a list of all the file names with a specific extension:
When you want to get a list of all the file names from a folder in Excel, the aforementioned formula works wonderfully.
What if, however, you only want the titles of PDF files, DOCX files, or file names that contain a particular keyword?
You can then employ a slightly different code in that scenario.
The code for retrieving all file names containing a particular phrase is provided below. (or of a specific extension).
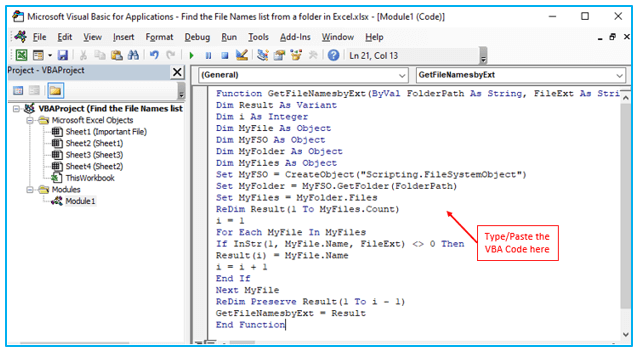
Function GetFileNamesbyExt(ByVal FolderPath As String, FileExt As String) As Variant
Dim Result As Variant
Dim i As Integer
Dim MyFile As Object
Dim MyFSO As Object
Dim MyFolder As Object
Dim MyFiles As Object
Set MyFSO = CreateObject(“Scripting.FileSystemObject”)
Set MyFolder = MyFSO.GetFolder(FolderPath)
Set MyFiles = MyFolder.Files
ReDim Result(1 To MyFiles.Count)
i = 1
For Each MyFile In MyFiles
If InStr(1, MyFile.Name, FileExt) <> 0 Then
Result(i) = MyFile.Name
i = i + 1
End If
Next MyFile
ReDim Preserve Result(1 To i – 1)
GetFileNamesbyExt = Result
End Function
GetFileNamesbyExt, a function that can be used in the worksheets, will be created by the aforementioned code. (just like regular functions).
The folder address and the extension keyword are the two parameters for this function. An array of file names with the specified suffix is returned. All file titles in the given folder will be returned if no extension or keyword is provided.
Syntax: =GetFileNamesbyExt(“Folder Location”,”Extension”)
Where to save this code?
To copy this code into the VB Editor, follow the instructions below:
Step 1: Press ALT+F11 to open VB Editor. Right-click any spreadsheet object you’re working in in the VB Editor, select “Insert”, and then select “Module”. Press the “R” key while holding down the Control key if you can’t see the Project Explorer.
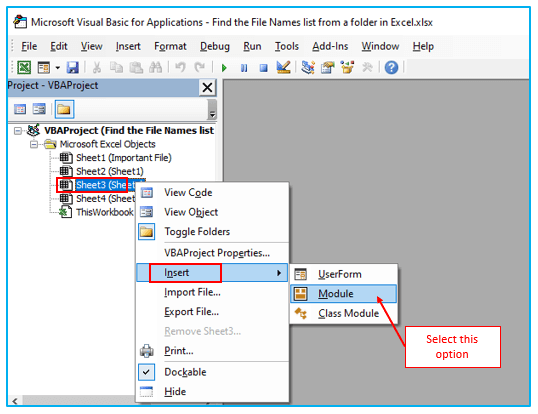
Step 2: To put the aforementioned code into the module code window, double-click the Module object.
How Should This Function Be Used?
The methods to use this function in a worksheet are as follows:
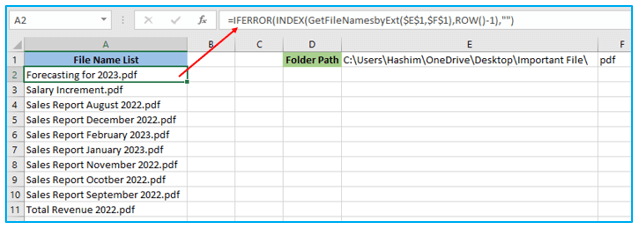
Step 1: The folder address of the folder from which you want to display the file names should be entered in any cell. This is what I typed into column E1.
Enter the extension (or the keyword) you want all the file titles to have in a cell. This is what I typed into column F1.
Enter the following formula (I’m entering it in column A2) in the cell where you want the list to appear:
=IFERROR(INDEX(GetFileNamesbyExt($E$1,$F$1),ROW()-1),””)
To obtain a list of all the files, copy and paste the formula into the cells below.
These are a few techniques for finding file names list from a folder in Excel.
For ready-to-use Dashboard Templates:
