Fill Automatically Sequential Data in Excel to revolutionize the way you manage and present your datasets. This feature not only saves time but also ensures accuracy and consistency across your spreadsheets. Whether you’re planning projects, scheduling events, or analyzing trends, automating sequential data input allows you to focus on more strategic tasks. Embrace this functionality to make your Excel experience more productive and error-free. Mastering the ability to fill automatically sequential data in Excel is a game-changer for anyone looking to enhance their data management skills.
This Content Covers:
- How to Place a Linear Series in Neighboring Cells?
- How to use the Fill Command to Fill a Linear Series into Adjacent Cells?
- How to Skip Rows in a Linear Series to Fill it?
- How to Apply Formulas in Neighboring Cells?
- How to Fill a Linear Series by Double Clicking on the Fill Handle?
- Completing a Growth Series (Geometric Pattern)
6.1 Enter the Growth Series’ First Two Numbers
6.2 Specify the Step Value and the First Number in the Growth Series
1. How to Place a Linear Series in Neighboring Cells?
In the bellow given table, we have a product list in column B. Now we want to give these products a serial number. Typing serial numbers for these items are time-consuming so we will see how we can create a linear series of numbers (1,2,3,4,5,……..) in the cells of column A. There are two ways you can do it.
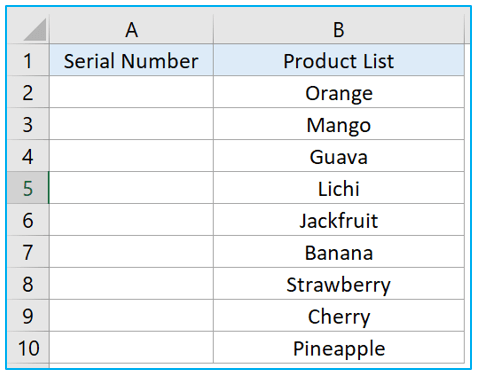
Method 1
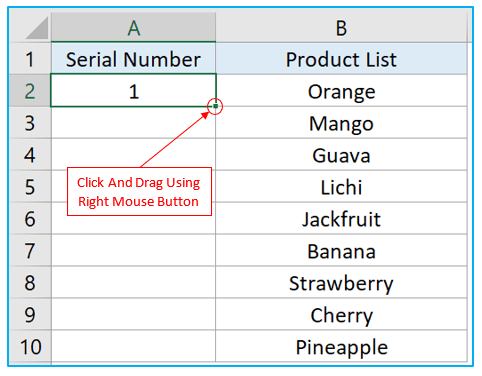
Step 1: Type 1 in cell A2 and click Enter key. Now Click and drag the bottom right corner of cell A2 using the right button of your mouse. The fill handle becomes a black plus sign when you move the mouse cursor over it. You can fill as many cells as you like by dragging the handle down the column.
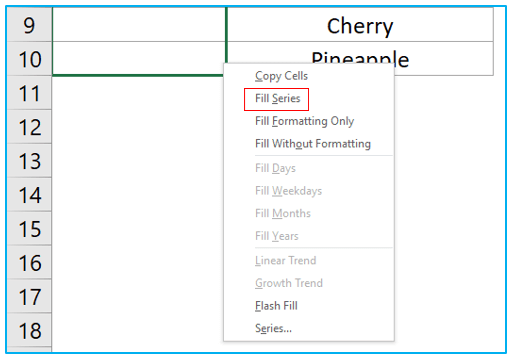
Step 2: When you have dragged the fill-handle down to the cells you want to fill, just release the mouse button and this list of options will appear in front of you. Choose Fill Series.
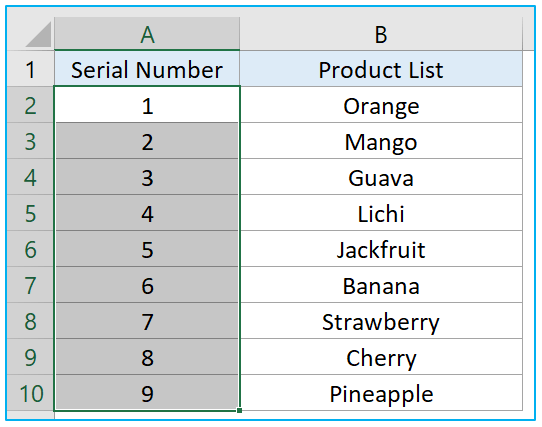
Step 3: All the cells will be filled with a linear series of numbers.
Method 2
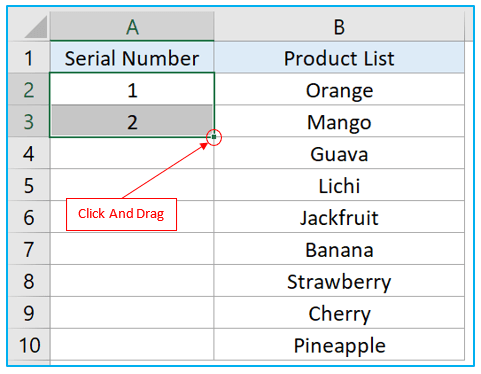
Step 1: Type the first two numbers in the first two cells rather than just one. Then, after selecting those two cells, drag the fill handle down to select all of the cells you want to fill.
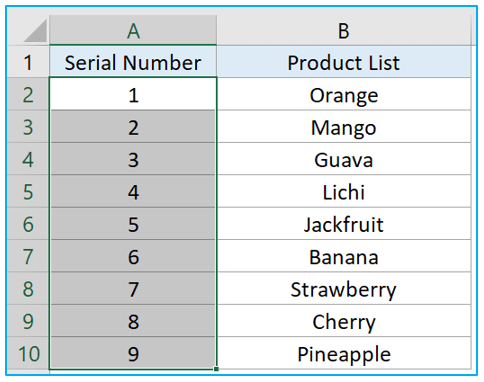
Step 2: All the cells are now filled with a linear series of numbers.
2. How to use the Fill Command to Fill a Linear Series into Adjacent Cells?
You can fill a series into neighboring cells by using the Fill Command on the Home tab. If you need to fill a lot of cells, the Fill Command can be a beneficial tool.
Step 1: To use the fill command you have to insert the first number of the linear series in the first cell. Now select all this cell with all the other cells that you wish to fill with the linear series.
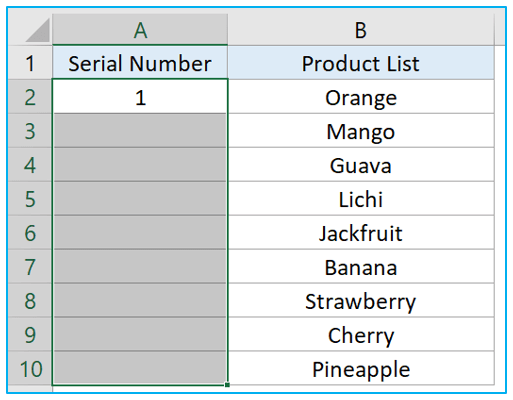
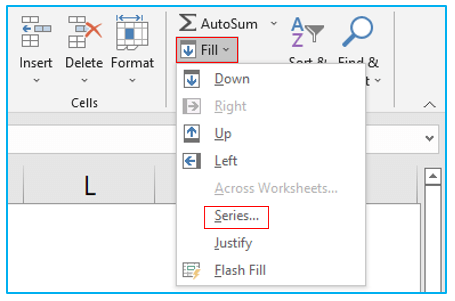
Step 2: Now go to Home>>Fill>>Series.
Step 3: Select Linear from Type and Columns from Series in as we are filling columns now. A linear series’ increment, or “step value,” should be entered inside Step Value box. Now click OK.
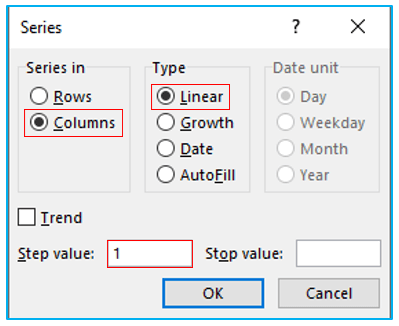
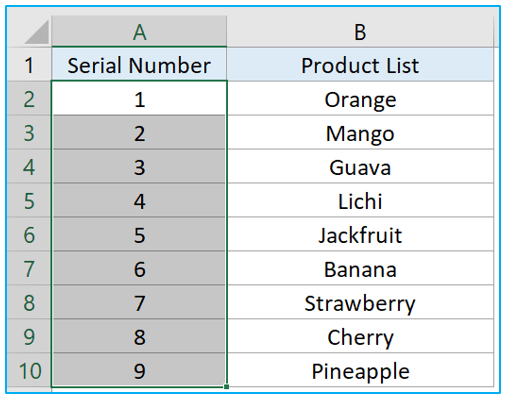
Step 4: The selected cells are filled with the linear series. You can use the Stop value on the Series dialog box if you have an extremely lengthy column or row that you wish to fill with a linear series by inserting a stop value inside it.
3. How to Skip Rows in a Linear Series to Fill it?
Step 1: To skip rows in a linear series, insert the first number in the first cell in a linear series. Then, choose that cell and one neighboring cell.
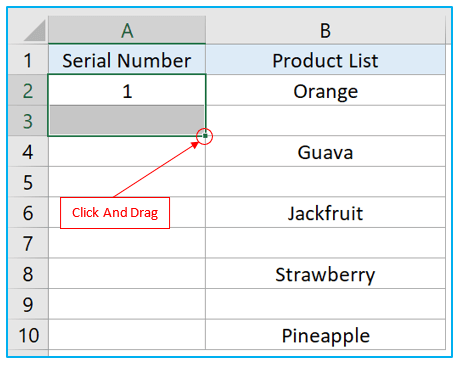
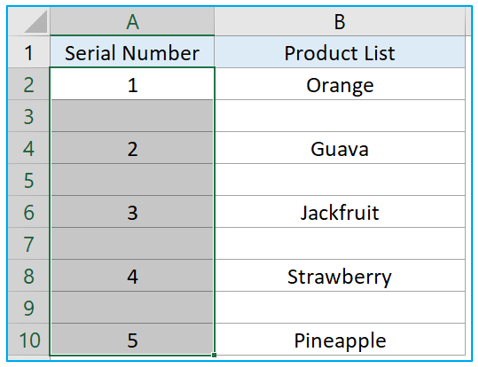
Step 2: After that, pull the fill handle downward until the required number of cells are filled. Your linear series will fill every other row once you’ve completed pulling the fill handle.
4. How to Apply Formulas in Neighboring Cells?
Step 1: Firstly, select the cell that contains the formula then drag the fill-handle downwards to apply the same formula in all the neighboring cells.
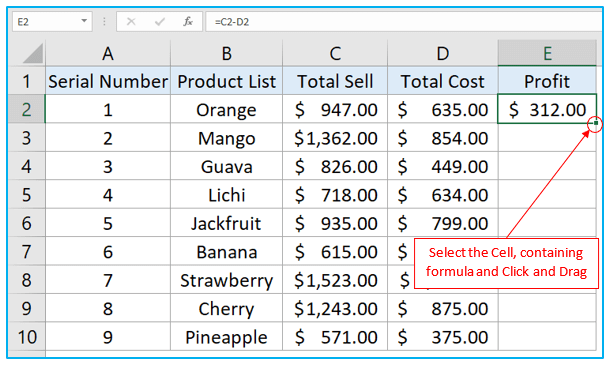
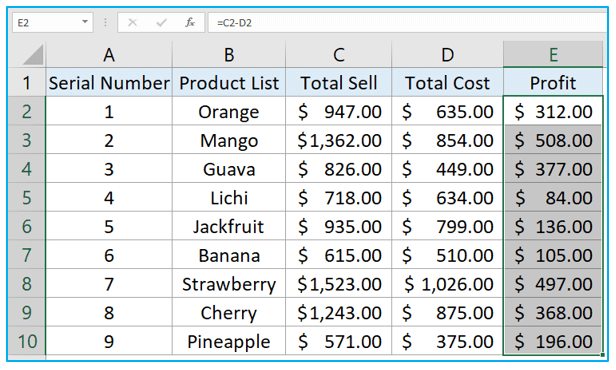
Step 2: When you release the mouse you will see all the selected cells are filled with the same formula as the first cell.
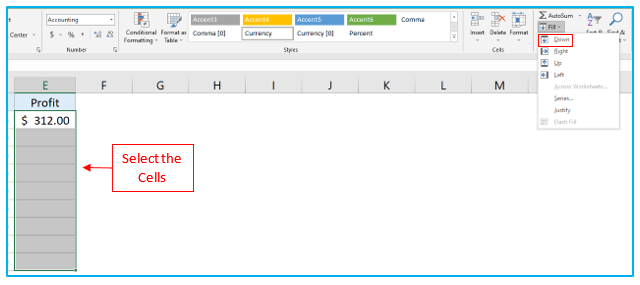
Step 3: Another way of filling cells with formulas is, select the cell that contains the formula, along with all the other cells that you want to apply the formula into. Then, go to Home>>Fill and click on Down.
5. How to Fill a Linear Series by Double Clicking on the Fill Handle?
By double clicking the fill handle, you can quickly fill a column with a linear series of data.
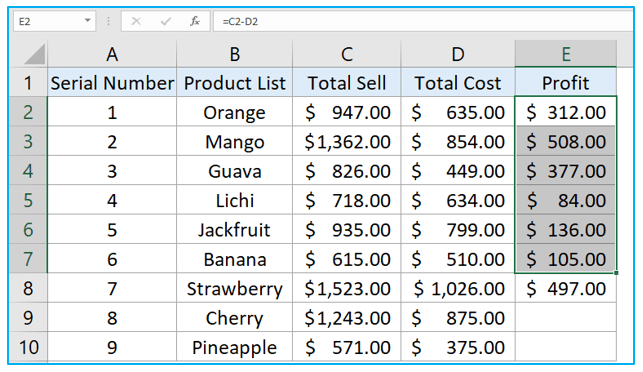
Step 1: Select cell E2 and double click on the fill-handle.
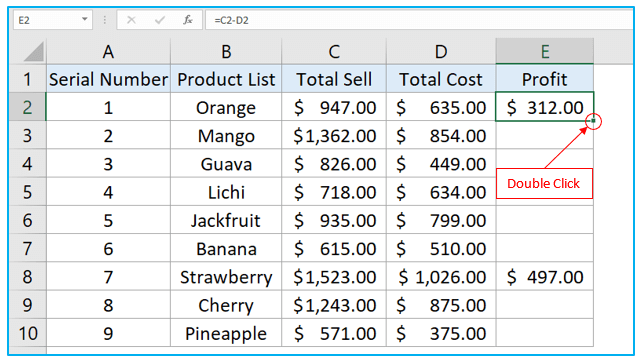
Step 2: The cells from E3 to E7 are filled with linear series of data but E9 and E10 are empty. This is because if any of the cells in the range you’re filling already have data in them, by default, only the empty cells above the first cell with data are filled. So, when you double click on the fill handle on cell E2, the formula is only copied down through cell E7.
6. Completing a Growth Series (Geometric Pattern)
A growth series, often known as a geometric pattern, uses a multiplication method to get the next number by multiplying the previous one by the step value. A growth series can be filled in one of two ways: either by inputting the first two numbers or the first number with the step value.
6.1 Enter the Growth Series’ First Two Numbers
Step 1: Enter the first two numbers into the first two cells of the row or column you want to fill in order to fill a growth series with those two values. Now select both the cells together and right-click and drag the fill handle over as many cells as you want to fill.
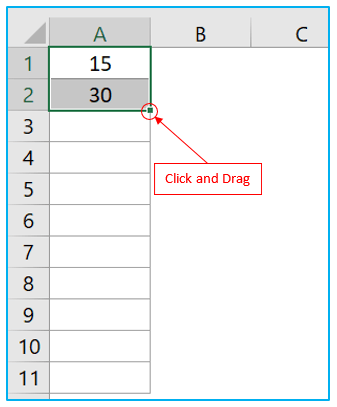
Step 2: After filling all the desired cells, release the fill handle and choose Growth Trend from the popup menu that appears.
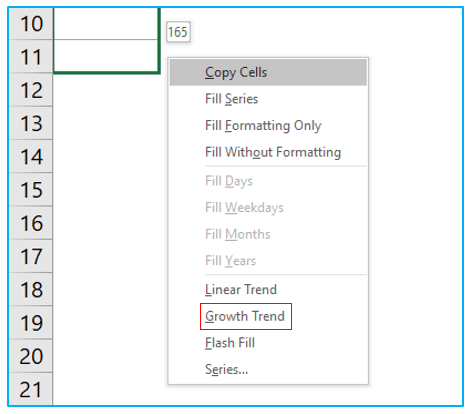
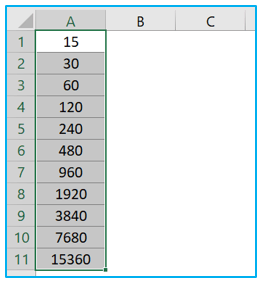
Step 3: What happens here is, Excel figures out that the step value is 2 here because the number in A2 is double the amount of the number in A1. So, if we divide A2 by A1 er get 2. So, every subsequent number is calculated by multiplying the previous number by 2.
6.2 Specify the Step Value and the First Number in the Growth Series
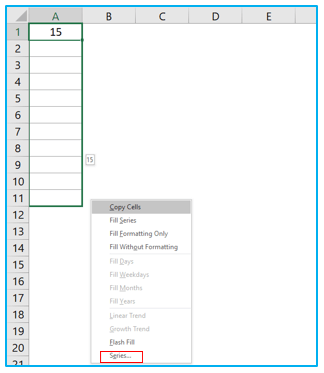
Step 1: Enter the first number into the first cell. Now select the cell and right-click and drag the fill handle over as many cells as you want to fill. After filling all the desired cells, release the fill handle and choose Series from the popup menu that appears.
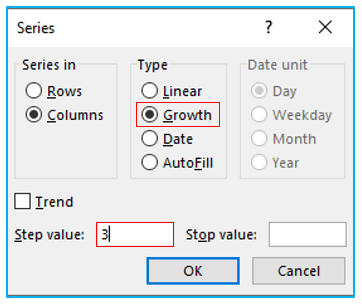
Step 2: Choose Growth from Type option and insert a step value inside Step Value box. Click OK.
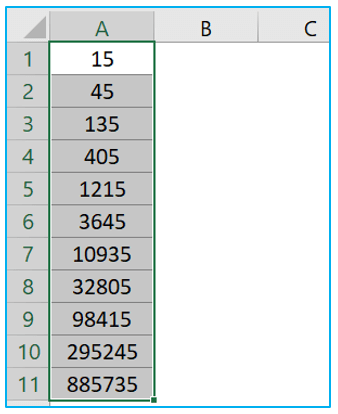
Step 3: As you selected 3 as the step value, what this does is multiplies the value of A1 by 3 and returns in A2 then it multiplies the value of A2 by 3 and returns in A3 and so on. So, the selected cells are filled with the growth series, with each number being three times of the one before it.
7. How to utilize the Fill Command to Fill a Series of Dates?
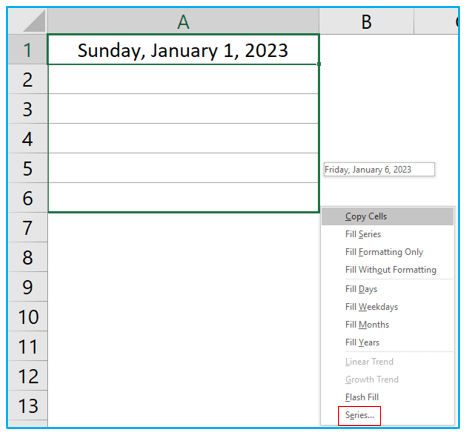
Step 1: Enter the first date into the first cell. Now select the cell and right-click and drag the fill handle over as many cells as you want to fill. After filling all the desired cells, release the fill handle and choose Series from the popup menu that appears.
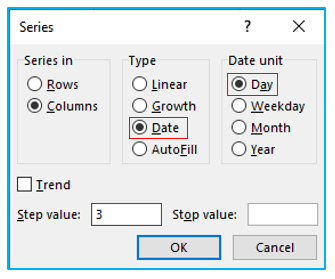
Step 2: From the Series dialogue box, set the Type to Date. Choose a Date Unit and insert a step value inside Step Value box. Click OK.
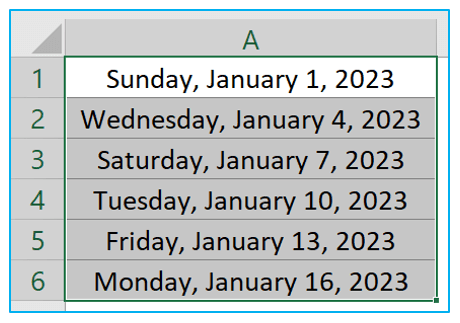
Step 3: The cells are filled with dates.
8. Fill a Series with the Built-In Items.
Using the fill handle, you can fill a series with data like as dates, weekdays, months, or years. Several built-in series in Excel can be filled automatically just by dragging the fill handle.
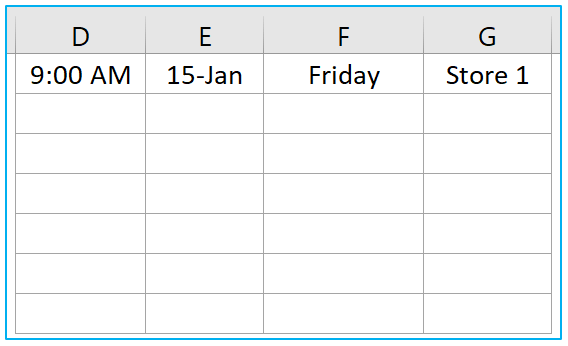
Step 1: There are some of the examples of some Excel built-in items which you can fill by dragging the fill handle.
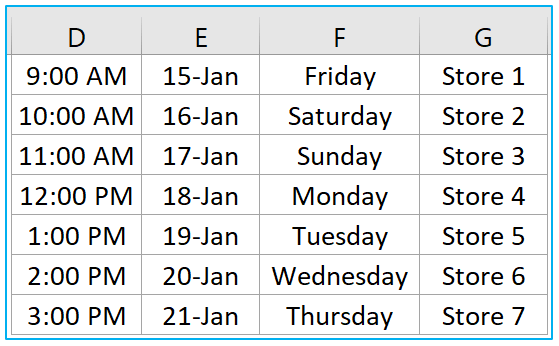
Step 2: Select and drag all of the cell’s fill handles downwards to fill these series with built-in items.
Application of Fill Automatically Sequential Data in Excel
- Creating Date Series: Automatically fill a column or row with consecutive dates for scheduling, planning, or tracking purposes, ensuring consistency and saving time.
- Generating Number Sequences: Create sequential numbers for lists, identifiers, invoices, or indexing without manually entering each number, enhancing efficiency.
- Establishing Time Intervals: Fill cells with recurring time intervals, such as hourly time slots or weekly timeframes, useful for appointment scheduling or event planning.
- Developing Financial Forecasts: Generate a series of financial figures, like incremental sales targets or depreciating asset values, to assist in budgeting and forecasting.
- Creating Custom Lists: Auto-fill cells based on custom lists (e.g., product names, department titles), streamlining data entry for repetitive elements.
- Pattern Recognition and Replication: Extend complex patterns (like alternating colors or symbols) across multiple cells, maintaining consistency and clarity in data presentation.
For ready-to-use Dashboard Templates:
