Delete Blank Rows in Excel effortlessly streamlines your data cleaning process, ensuring optimal spreadsheet organization and efficiency. With Delete Blank Rows in Excel, you can say goodbye to cluttered worksheets and hello to a streamlined, professional presentation of your data. Eliminate the hassle of manual deletion and let this powerful tool do the work for you, saving you time and effort. Whether you’re working with large datasets or smaller tables, Delete Blank Rows in Excel provides a seamless solution for tidying up your spreadsheets. Take control of your data and enhance your productivity with Delete Blank Rows in Excel, the essential tool for maintaining clean and organized Excel files. Say farewell to unnecessary blank rows and hello to a more polished, professional presentation of your data. Experience the convenience and efficiency of Delete Blank Rows in Excel today and unlock the full potential of your spreadsheet management tasks.
- This Content Covers:
- How to Delete Blank Rows in Excel with Options and Tools?
- Using Go to Special Dialogue Box
- Using Find Option
- With Filter Option
- Using Advanced Filter Option
- With Sort Option
- Using Power Query
- How to Delete Blank Rows in Excel with Functions?
- Using FILTER Function
- Using COUNTBLANK Function
- Delete Blank Rows in Excel Manually
- Delete Blank Rows using a VBA Code
1. How to Delete Blank Rows in Excel with Options and Tools?
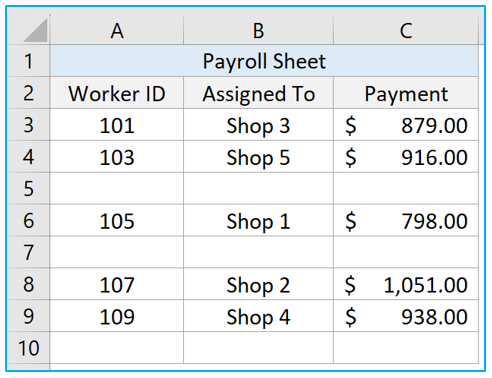
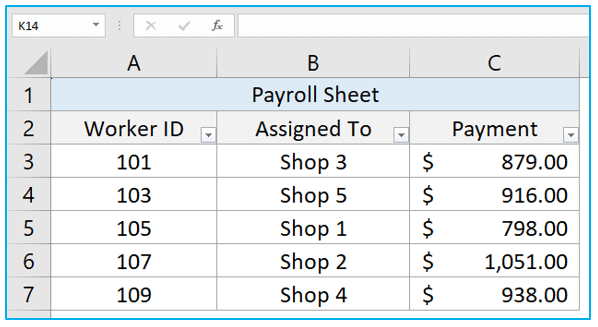
Microsoft Excel provides us with a variety of its in-built tools and options to delete blanks or blank rows if needed. Now we will see some of those options and tools and how to utilize them to remove blank rows. We will use the below-given data for this purpose.
1.1 Using Go to Special Dialogue Box
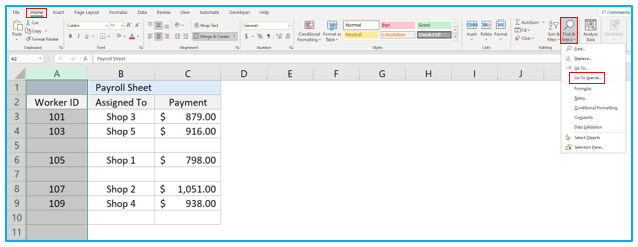
Step 1: To delete the blank rows, you can either select the entire data-table or the first column of this data table. In this case we will select column A by clicking on the header. After selecting the column, go to Home>>Find & Select then click on Go To Special option from the list to open the dialogue box.
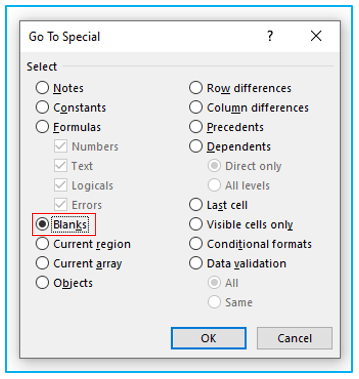
Step 2: From Go To Special dialogue box, click on Blanks and press OK.
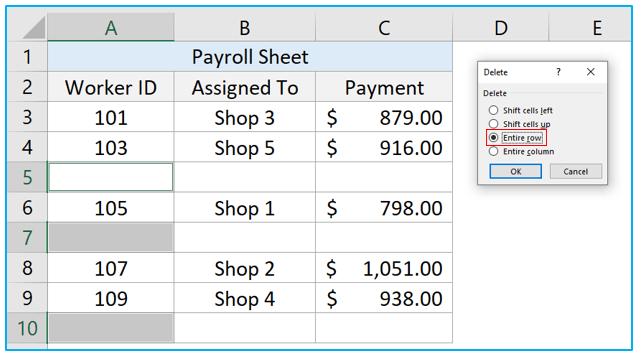
Step 3: This will select the blank cells, now press CTRL+Minus (-) shortcut keys to open the Delete box. Select Entire Row option and press OK. The blank rows from this datasheet will be deleted.
1.2 Using Find Option
Step 1: Select the data-table and press CTRL+F shortcut keys to open the Find box in Find and Replace dialogue box. Or you can go to Home>>Find & Select>>Find to open this dialogue box. Click on Options to expand the other options available in this dialogue box.
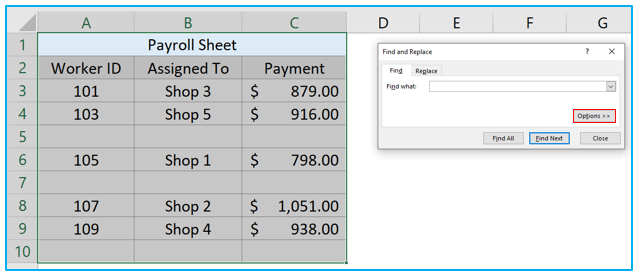
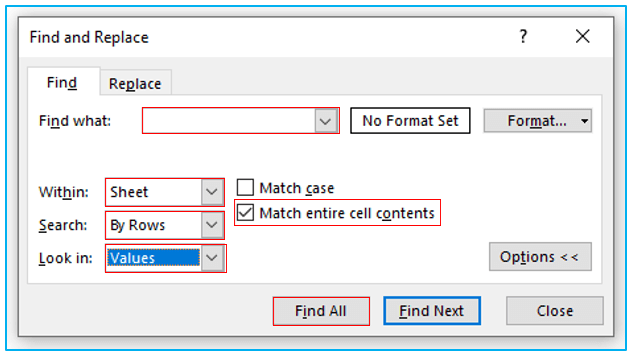
Step 2: Keep the Find What box empty. Check Match entire cell content box. Select Sheet from Within box, By Rows from Search box and Values from Look in box. Now press Find All.
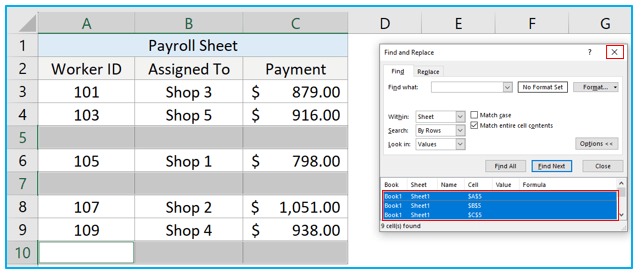
Step 3: References to the blank cells will be displayed at the bottom part of this dialogue box. Click on one of the references and press CTRL+A to select them all. This will also select these cells inside the worksheet. Now close the dialogue box.
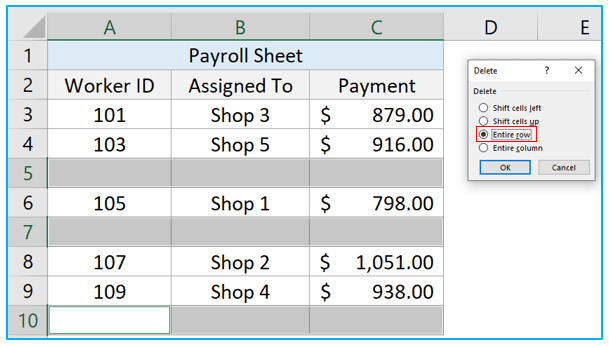
Step 4: Press CTRL+ Minus (-) keys and select Entire row and press OK to delete the blank rows.
1.3 With Filter Option
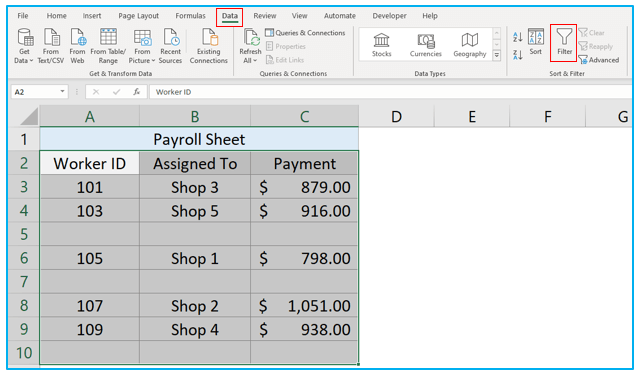
Step 1: Select the dataset and go to Data tab and select Filter option. Or you can use CTRL+SHIFT+L shortcut keys to add filters to them.
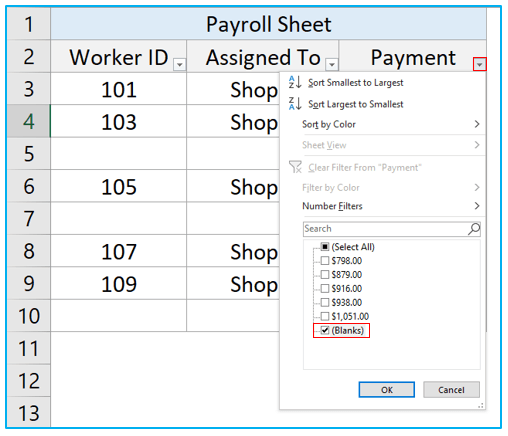
Step 2: Click on the filter button and check only Blanks from the list, then press OK.
Step 3: All the blank cells are now visible only. Select them or select the blanks from the first column only and press CTRL+ Minus (-) keys. This message will pop-up, press Ok and the blank rows will be removed.

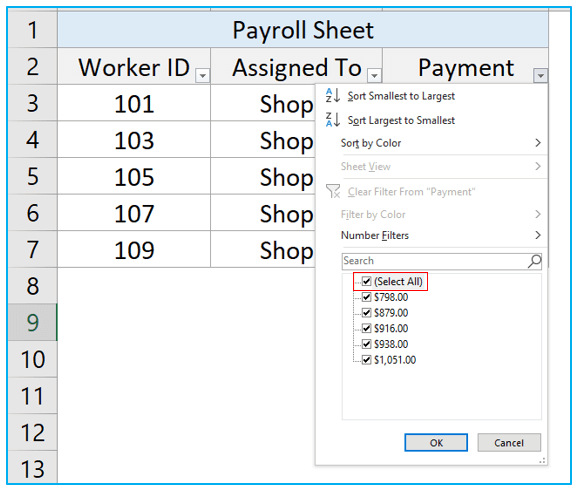
Step 4: Click on the filter button again and check Select All, then press OK. If you don’t want the filter buttons now, you can remove them by selecting the filtered cells again and pressing CTRL+SHIFT+L keys.
1.4 Using Advanced Filter Option
This method is a bit complicated than the previous ones, so follow carefully.
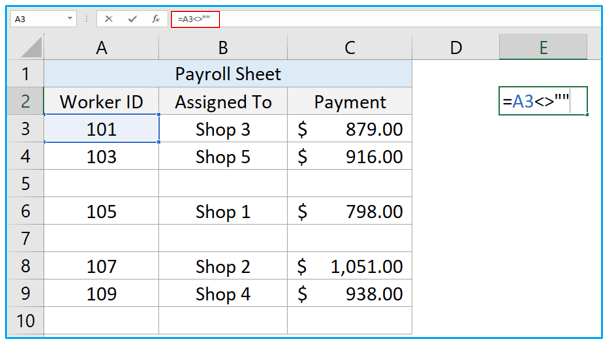
Step 1: Select cell E2 and insert this formula inside the cell, then press Enter key.
Step 2: Now go to Data tab and select Advanced option from Sort & Filter section.
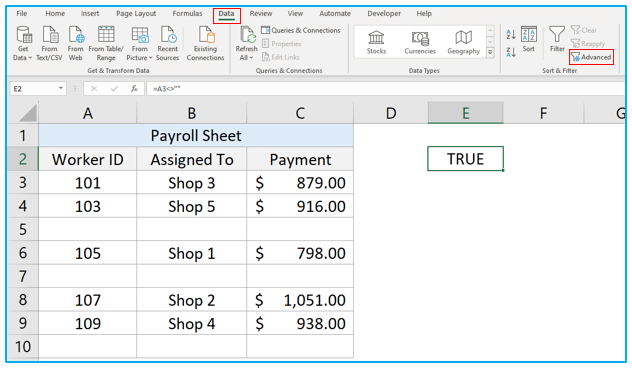
Step 3: Select Copy to another location option and then insert the List range, Criteria range (E1:E2 in this instance) and Copy to location as shown in the picture below. Then press OK.
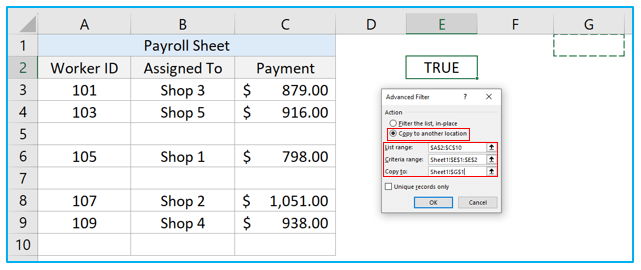
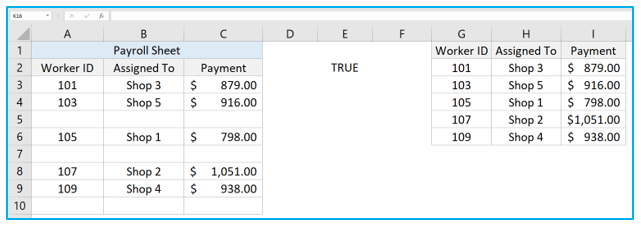
Step 4: A filtered copy of that data will be presented in the copy to location that you have set inside Advanced Filter dialogue box.
1.5 With Sort Option
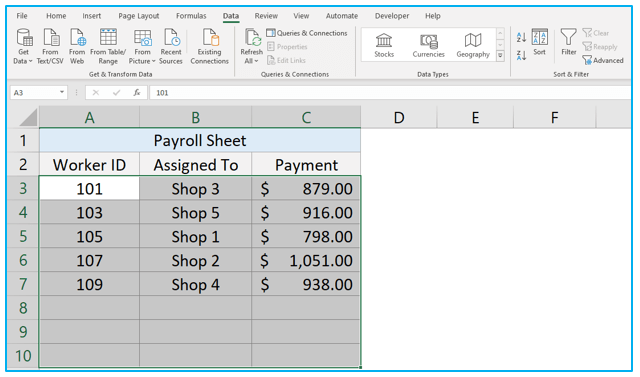
Step 1: Select the dataset, then go to Data tab and click on the ascending or descending button from the Sort option.
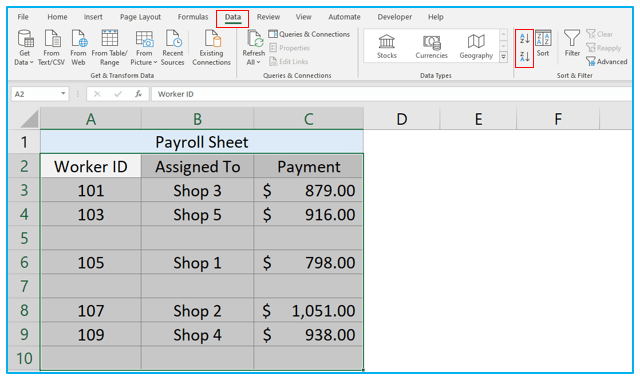
Step 2: All the blank rows now will move to the bottom of the table.
1.6 Using Power Query
The Power Query option in excel can also remove blank rows very effectively and the most impressive part is whenever you input any new data in the original table, it will also get updated inside the power query table with a simple refresh.
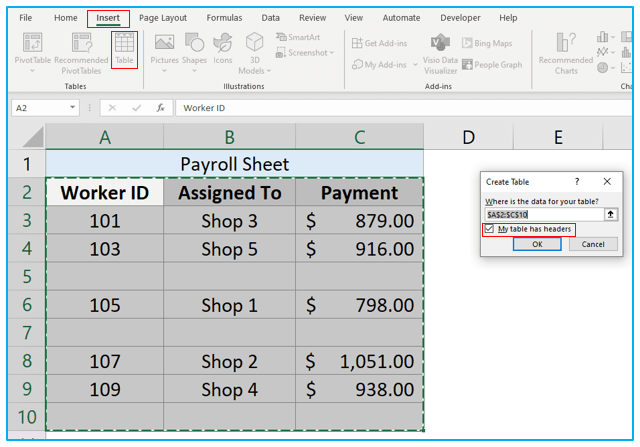
Step 1: Select the range of data from your worksheet and then press CTRL+T to open Create Table dialogue box. Make sure the range is correct and My table has headers box checked, then press OK. Or select the range and then go to Insert>>Table to convert this dataset into table.
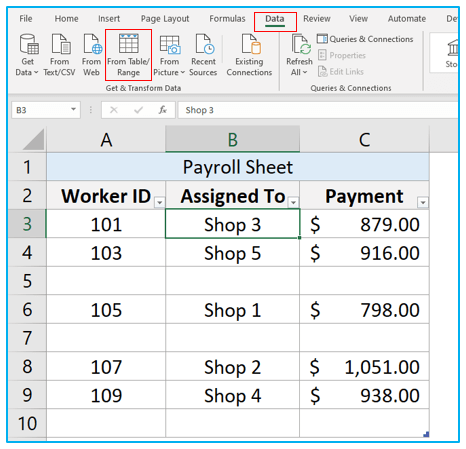
Step 2: Select any cell from this data table then go to Data tab and select From Table/Range. This will open the Power Query.
Step 3: Go to Home tab inside Power Query and click on Remove Rows>>Remove Blank Rows.
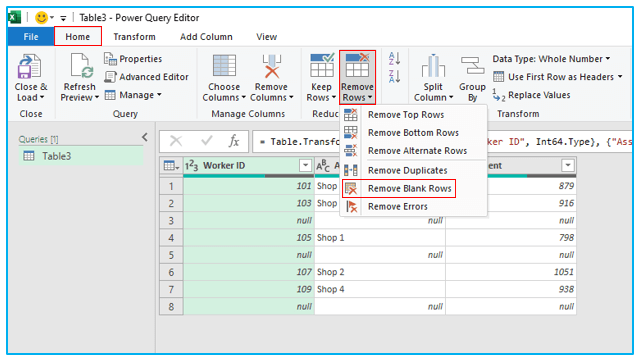
Step 4: The blank rows are now removed. Now click on Close & Load and select Close & Load To… option.
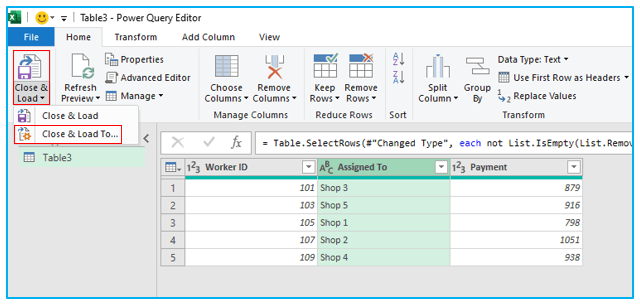
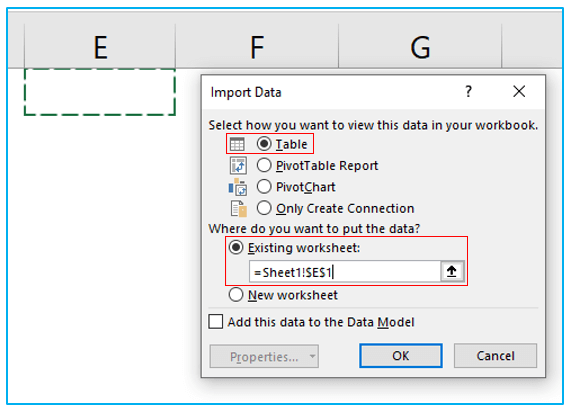
Step 5: Select Table option and if you want the table to be displayed in the same worksheet then select Existing Worksheet option and insert the location where you want it to display. Press OK.
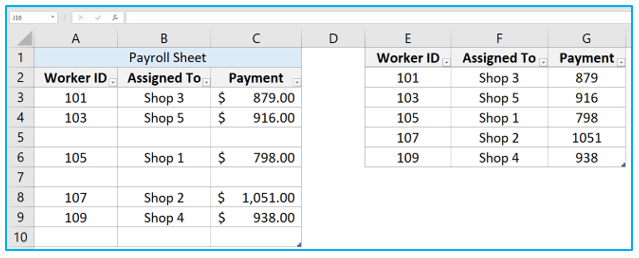
Step 6: This will return a copy of the table without blank rows in the same worksheet.
2. How to Delete Blank Rows in Excel with Functions?
There are some functions and formulas you can use to delete blank rows from your worksheet. Let’s see how they work.
2.1 Using FILTER Function
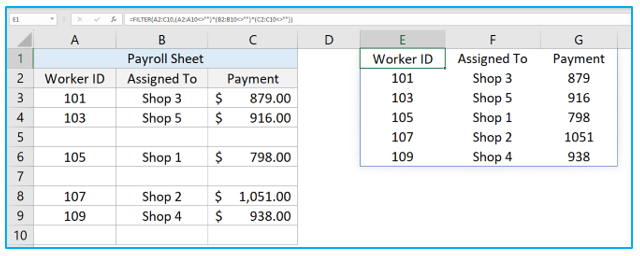
Step 1: Select a cell where you want the data to be displayed and insert this FILTER formula inside it.
=FILTER(A2:C10,(A2:A10<>””)*(B2:B10<>””)*(C2:C10<>””))
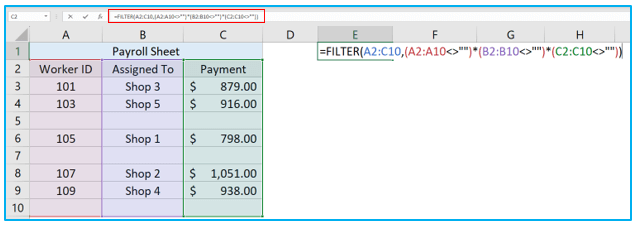
Step 2: Press Enter to see the result. This function is only available in Excel 365 so it will not work in any other versions of Excel.
2.2 Using COUNTBLANK Function
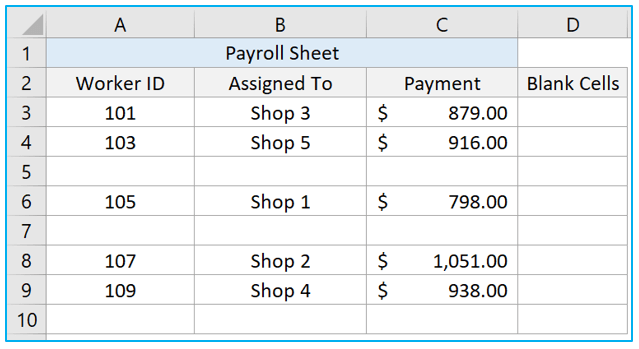
Step 1: First add another column in column D to use the COUNTBLANK function in.
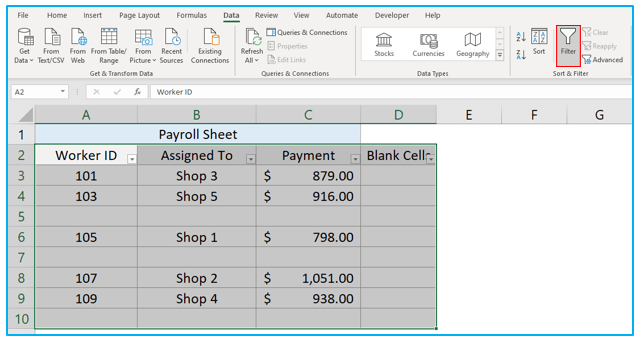
Step 2: Now select the total range and press CTRL+SHIFT+L to turn the Filter option on. Or you can turn it on from Data tab.
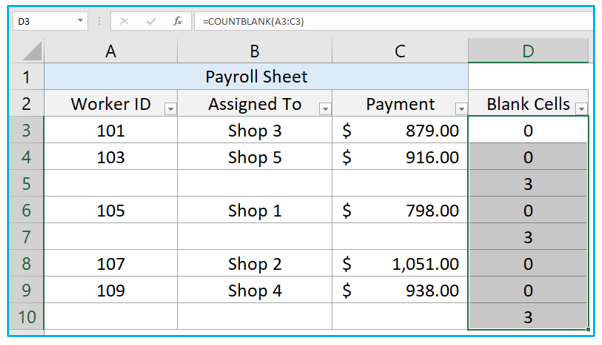
Step 3: Select cell D3 and insert the COUNTBLANK formula shown in the below picture. Then drag the fill-handle down to apply the formula in other cells of this column too.
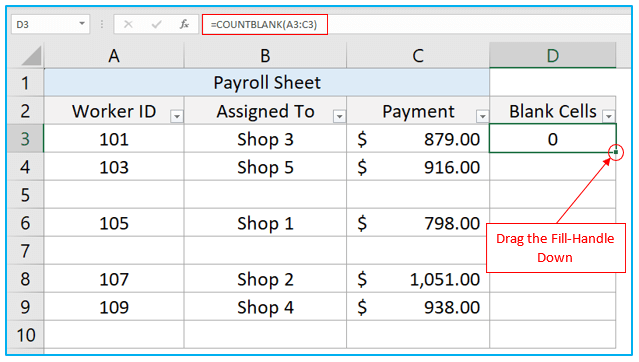
Step 4: It will return the number of blank cells in each row.
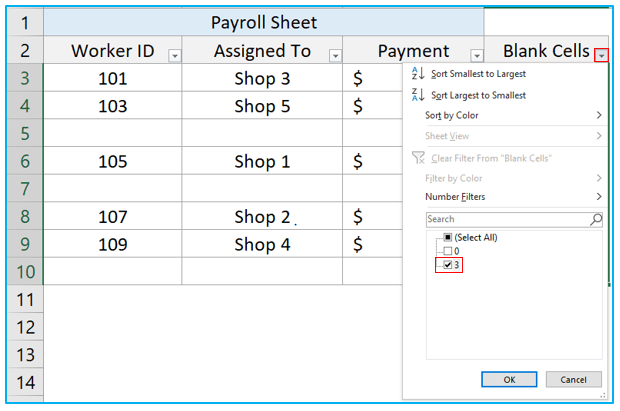
Step 5: Click on the filter button of Blank Cells column and select the blank cell digit, then press OK.
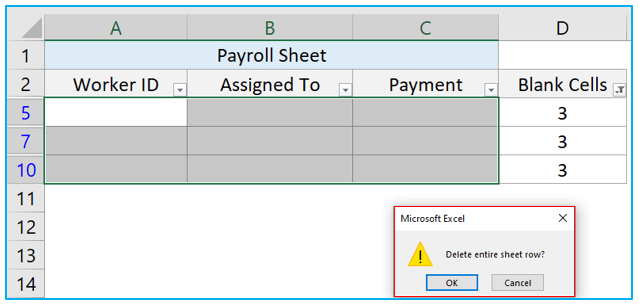
Step 6: Now only the blank rows are visible, you can delete them using any of the methods shown before. Here CTRL+ Minus (-) shortcut has been used to delete the sheet rows after selecting them.
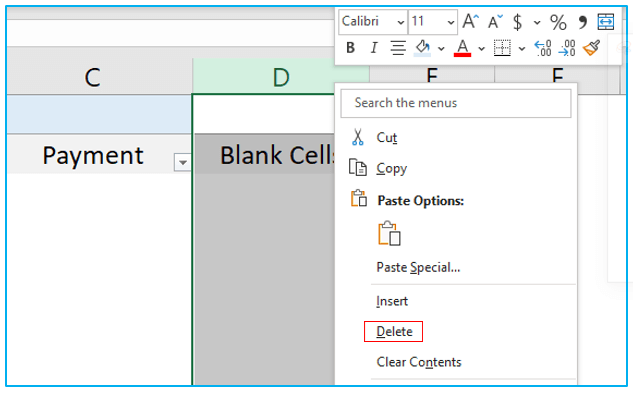
Step 7: Once the blank rows are deleted, delete the Blank Cells column too by right clicking on column D header and selecting Delete option.
Step 8: Once you delete the extra column, the data sheet will be visible again without any blank rows. You can now remove the filter button by clicking CTRL+SHIFT+L.
3. Delete Blank Rows in Excel Manually
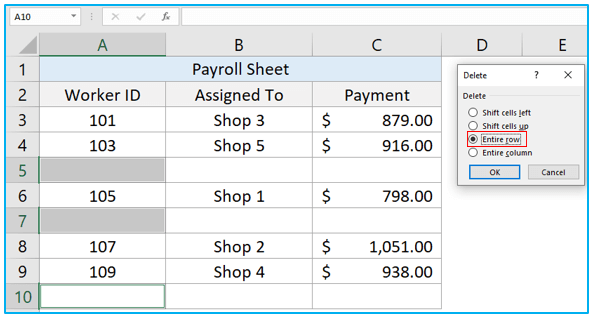
Step 1: To manually delete the blank rows, press and hold the CTRL button and select the blank cells from column A manually. Then press CTRL+ Minus (-) to open Delete box, select Entire row option, and press OK.
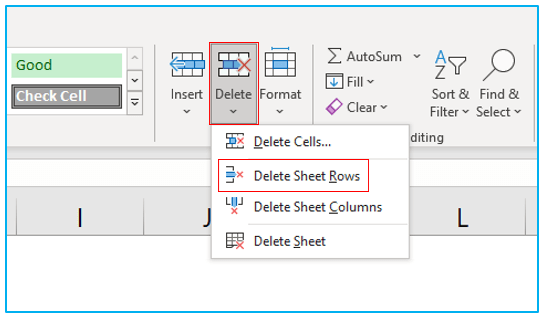
Or after manually selecting the blank cells go to Home>>Delete>>Delete Sheet Rows.
OR,
4. Delete Blank Rows using a VBA Code
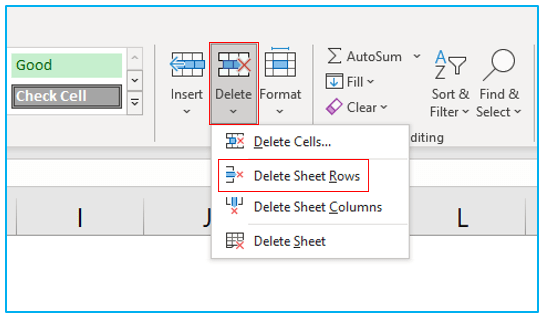
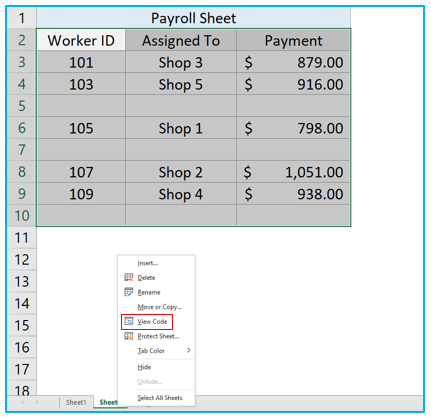
Step 1: Select the range, right click on worksheet name, and select View Code.
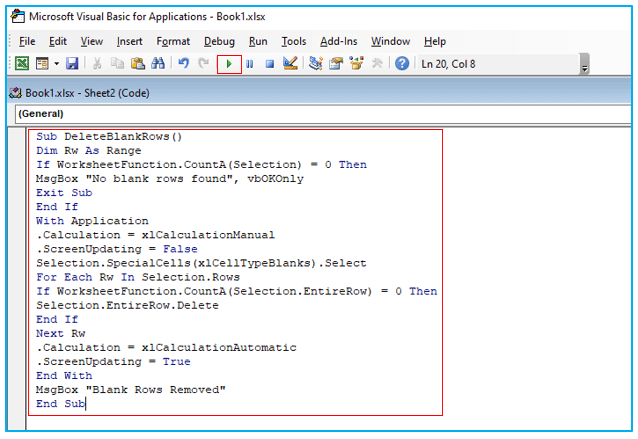
Step 2: Insert the below given code inside VBA module and press the RUN button or F5 key.
Sub DeleteBlankRows()
Dim Rw As Range
If WorksheetFunction.CountA(Selection) = 0 Then
MsgBox “No blank rows found”, vbOKOnly
Exit Sub
End If
With Application
.Calculation = xlCalculationManual
.ScreenUpdating = False
Selection.SpecialCells(xlCellTypeBlanks).Select
For Each Rw In Selection.Rows
If WorksheetFunction.CountA(Selection.EntireRow) = 0 Then
Selection.EntireRow.Delete
End If
Next Rw
.Calculation = xlCalculationAutomatic
.ScreenUpdating = True
End With
MsgBox “Blank Rows Removed”
End Sub
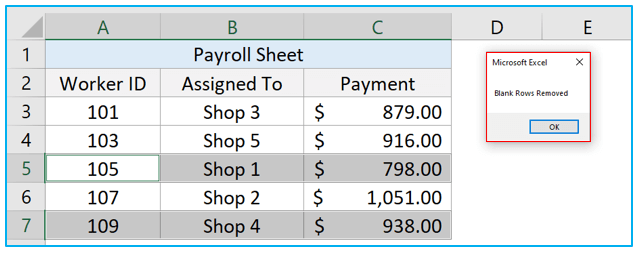
Step 3: The blank rows will be deleted from the selected range and a confirmation message will appear on your screen.
Step 3: The blank rows will be deleted from the selected range and a confirmation message will appear on your screen.
Application of Delete Blank Rows in Excel
- Data Cleaning: Easily remove unnecessary blank rows from your Excel spreadsheets, improving data accuracy and readability.
- Streamlined Analysis: Ensure that your data analysis is not skewed by eliminating blank rows that may affect calculations or visualizations.
- Improved Presentation: Present your data more professionally by removing blank rows, creating a cleaner and more organized appearance.
- Enhanced Efficiency: Save time by automating the process of deleting blank rows, allowing you to focus on analyzing and interpreting your data.
- Data Integration: Prepare your data for integration with other software or databases by removing blank rows that could cause compatibility issues.
- Consistent Formatting: Maintain consistent formatting throughout your spreadsheet by removing any unnecessary blank rows that disrupt the layout.
For ready-to-use Dashboard Templates:
