Subtraction in Excel is a fundamental skill that simplifies data analysis and numerical calculations. By mastering subtraction in Excel, you can effortlessly manage budgets, track expenses, and analyze financial data with precision. Say goodbye to manual calculations and embrace the efficiency and accuracy that Excel provides. Whether you’re reconciling accounts, performing inventory management, or calculating differences in data sets, subtraction in Excel streamlines your workflow and ensures reliable results. Harness the power of subtraction in Excel to enhance your data manipulation capabilities, reduce errors, and improve overall productivity. Make your data work for you by leveraging Excel’s powerful subtraction functions, transforming complex tasks into simple, efficient processes.
This Tutorial Covers:
- Subtracting Cells/Values in Excel
- Subtracting a Value from an Entire Column
- Subtracting a Cell Value from a Whole Column
- Subtract Multiple Cells From One Cell
- Subtracting Cells in Two Columns
- Subtract Dates in Excel
- Subtract Time in Excel
- Subtract Percentages in Excel
- Subtract Using Paste Special
1. Subtracting Cells/Values in Excel:
Let’s start with a very basic scenario in which I want to remove two values—say let’s 500 and 100—to get the result.
How to do it is as follows:
Enter the equal to sign (=) after selecting the cell from which you want to remove. Type the first number in. Enter the negative (-) symbol to indicate subtraction. Put in the following number. Press Enter.

The computation would be done in the cell and the result would be shown using the aforementioned steps.
In Excel, this is known as a formula since it begins with an equal-to sign and ends with the formula or equation that needs to be solved.
We hard-coded the values in the cell in the aforementioned example. This indicates that the values 500 and 100 were manually input into the field.
When these values are present in cells, a similar formula can be used as well. In that instance, you can use the cell reference rather than manually entering the values.
Assume you wish to subtract the value in cell B2 from the value in cell B1 if you have two values in cells B1 and B2 (as seen below).
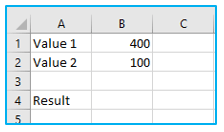
The equation is in below image:
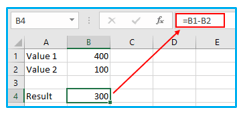
The only difference is that we used the cell reference that contains the value rather than manually entering the numbers in the calculation.
The advantage of doing this is that the formula would immediately update and display the right result in the event that the values in the cells changed.
2. Subtracting a Value from an Entire Column:
Let’s move on to some slightly more complicated subtraction computations now.
In the aforementioned example, we desired to remove two values.
What happens, though, if you wish to remove one specific value from a column that contains a list of values?
Again, Excel makes it simple to do that.
Let’s say you have the data set depicted below and wish to remove 50 from each cell in column A.
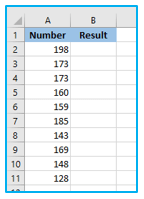
The procedures are as follows:
Step 1: Put the following formula in cell B2:
=A2-50
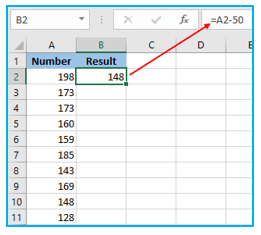
Step 2: After entering the formula, copy the cell B2, then choose cells B3 to B11. After that, paste the copied cell.
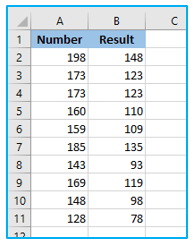
Excel will copy the formula in cell B2 and apply it to every cell where you pasted the copied cell when you do this.
Additionally, Excel will automatically change the cell reference when it decreased because we used a cell reference in the formula (A2).
For instance, the formula in cell B3 would change to =A3-50, and in cell B4, it would change to A4-50.
When utilizing Microsoft 365:
The approach I’ve described above is compatible with all versions of Excel, but if you’re using Microsoft 365, you may use a formula that is even simpler.
If you have the same data (in column A) and want to remove 50 from each cell, enter the formula in cell B2 as follows:
=A2:A11-50
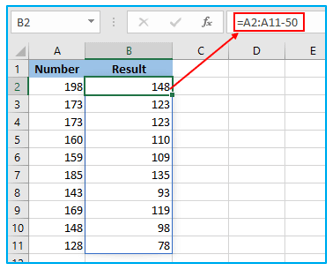
All done!
Excel will take care of copying and pasting the formula into other cells, so you don’t need to worry about it.
This is referred to as a dynamic array formula since the outcome returns an array of values rather than just one. These values then overflow into the adjacent cells in the column.
Note: Make sure the cells where the result would be populated are empty in order for these dynamic array formulas to function. You will get the #SPILL! error in the cell where you enter the formula if there is already a number of texts in these cells.
3. Subtracting a Cell Value from a Whole Column:
In the last illustration, I took away 50 from the number of cells in a column.
The same idea may be applied to removing a value from a cell from a whole column.
Consider the following dataset, where you wish to deduct the value in cell D2 from every cell in column A.
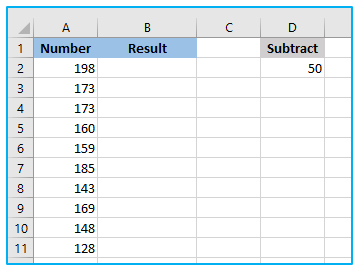
The procedures are as follows:
Step 1: Put the following formula in cell C2:
=A2-$D$2
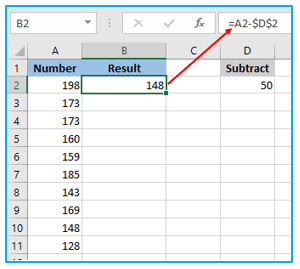
Step 2: After entering the formula, copy the cell B2, then choose cells B3 to B11. After that, paste the copied cell.
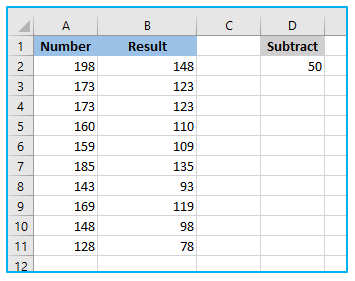
In this example, I’ve used the formula A2-$D$2, which ensures that cell D2—the number I’m subtracting—remains the same when I copy the formula for all the other cells in column B.
By placing a dollar sign between the row number and column alphabet, you ensure that the reference will stay $D$2 even if you copy and paste the cell with this reference. Since these don’t change, this is referred to as an absolute reference
If you copy this formula to cell B3, it will appear as A3-$D$2, and if you copy it to cell B4, it will appear as A4-$D$2.
Therefore, even though the absolute reference changes as we copy it down from A3 to A4, the initial component of the reference keeps moving from A3 to A4.
As a result, we can remove the same amount from each cell in column A.
When utilizing Microsoft 365:
You may also use the following formula if you’re using Microsoft 365 and have access to dynamic arrays:
=A2:A11-D2
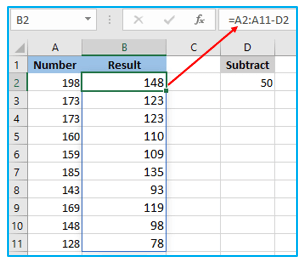
You don’t have to be concerned about references changing while using dynamic arrays. It will look after itself.
4. Subtract Multiple Cells From One Cell:
Similar to the example above, you can also remove all of the values from a column from a single value or the cell where the value is stored.
Assume you have the data set depicted below and wish to subtract the value in cell A2 from all the values in column B.
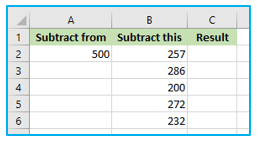
The steps to subtract multiple cells from one cell are described below:
Step 1: Put the following formula in cell C2:
=$A$2-B2
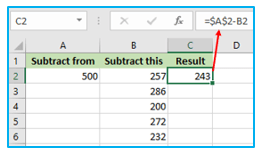
Step 2: After entering the formula, copy the cell C2, then choose cells C3 to C6. After that, paste the copied cell.
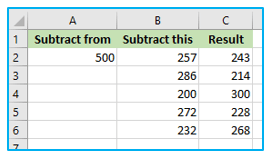
The reasoning is precisely the same as in the last example, where I locked the reference to $A$2 by placing a $ symbol in front of the column name and row number.
By doing it this way, the cell reference $A$2 remains the same when we copy the formula into column C, but the formula’s second reference (B2) changes as we move down the cell.
When utilizing Microsoft 365:
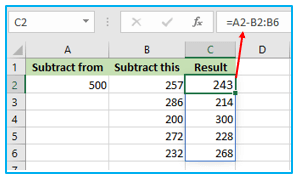
You may also use the following formula if you’re using Microsoft 365 and have access to dynamic arrays:
=A2-B2:B6
5. Subtracting Cells in Two Columns:
In the majority of real-world scenarios, you’ll have two columns with cells in the same row that you wish to subtract in order to obtain the result.
Consider a scenario in which you want to calculate the Profit and you have the numbers for the Buying price and Selling price in two columns.
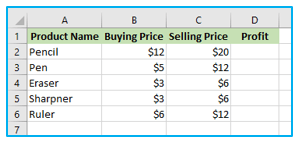
The procedure of subtracting cells from two columns:
Step 1: Put the following formula in cell C2:
=C2-B2
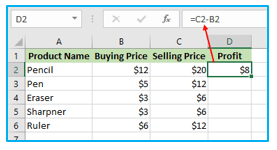
Step 2: After entering the formula, copy the cell C2, then choose cells C3 to C6. After that, paste the copied cell.
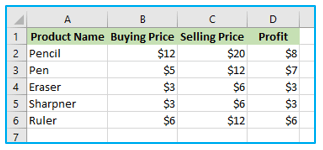
The reference in the formula above will automatically change as it is copied lower, giving you the difference between revenue and expense in that row.
When utilizing Microsoft 365:
The approach I’ve described above is compatible with all versions of Excel, but if you’re using Microsoft 365, you may use a formula that is even simpler.
If you want to subtract the two columns from a set of the same data, you can use the formula below:
=C2:C6-B2:B6
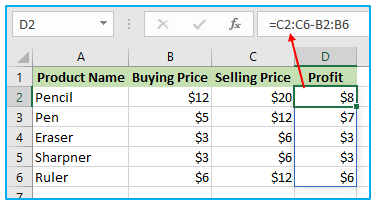
Note that this is made possible by a feature called Dynamic Arrays in Microsoft 365’s Excel. You won’t be able to utilize this formula if you don’t have these.
6. Subtract Dates in Excel:
Excel’s backend saves date and time values as numbers.
For instance, 44927 stands on January 1, 2023, and 44928 for January 2, 2023.
This makes it simple for us to find the difference and subtract dates in Excel.
If you have two dates, for instance, you can subtract them to see how many days have passed between them.
Let’s say I want to calculate the number of days that pass between two dates in a dataset with the “Start Date” and “End Date” as shown below.
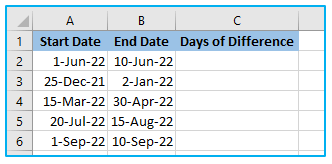
The procedure of subtracting dates in excel:
Step 1: Enter the formula as follows, then use the autofill handler to fill up the rest of the cells as follows:
=B2-A2
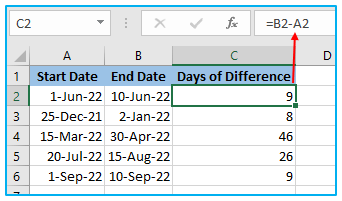
It’s possible that Excel will provide you with the result in date format rather than the above-described numerical format.
This occasionally occurs when Excel tries to be helpful and takes the format from the column next to it.
By heading to the Home tab and selecting General in the number format drop-down, you can quickly make changes to this and retrieve the values in numbers.
Note: To use this formula, you must use a date that Excel accepts as a valid date format. For instance, if you enter 01.01.2020, Excel will treat it as a text string rather than a date. Therefore, using this format to subtract dates won’t work.
7. Subtract Time in Excel:
Even time values are kept in Excel as numbers, just like dates.
The whole number would stand in for the day of the date while the decimal would stand in for the time.
For instance, 44927.38 would represent 9:00 AM on January 1, 2023, while 44927.79 would represent 7:00 PM on January 1, 2023.
If you have time values in Excel, what you actually have there are decimal numbers that reflect that time value in the background (which are formatted to be shown as time in the cells).
Additionally, you can readily subtract these as they are integers.
I want to determine the difference between the start time and the end time in the data set that is shown below.
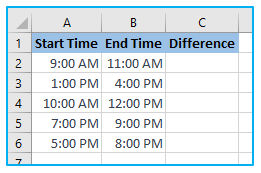
The following equation will calculate the difference between these time values for us:
=B2-A2
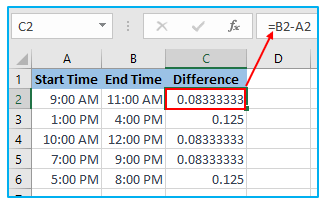
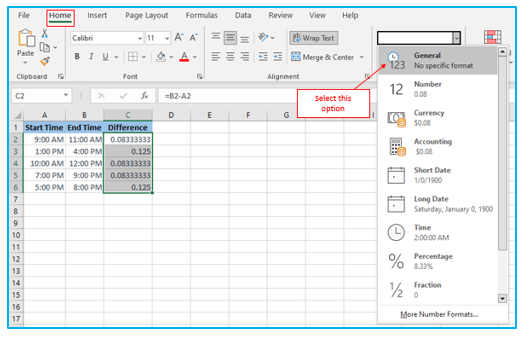
Excel is likely to alter the format of the result column to display the difference as a time value (for example, it may show you 2:00 AM instead of 0.0833333). Simply select “General” from the format dropdown menu on the “Home” tab to change this.
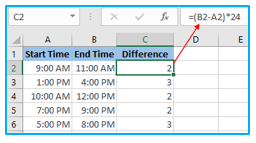
It should be noted that while dealing with times, you will receive the value in decimals; however, if you would prefer to receive it in hours, minutes, or seconds, you can do so by multiplying the decimal value by 24 (to obtain hours), 24*60 (to obtain minutes), or 24*60*60 (to obtain seconds).
Therefore, you can use the following formula to determine how many hours are in the given time in our dataset:
=(B2-A2)*24
8. Subtract Percentages in Excel:
In Excel, removing percentages from a value differs slightly from removing two decimals or full integers.
If you have two % numbers and wish to subtract one from the other, you can do so by using the formula shown below.
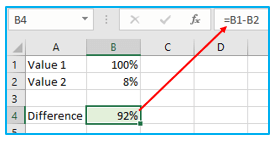
However, you must do differently if you wish to take a % value away from a non-percentage variable.
Consider that you have 100 in cell B1 and that you wish to deduct 8% from it.
In this situation, you can use the following formal:
=B1*(1-8%)
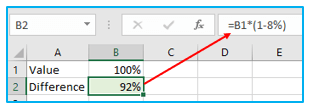
You can use this formula below as well:
=B1-B1*20%
You can also use the cell reference if the percentage value is stored in a cell. For instance, suppose you have the dataset depicted below and you wish to remove the number in cell B1 from the % value in cell B2.
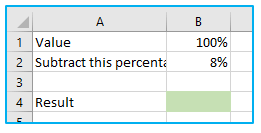
Then, use the following equation:
=B1-B1*B2
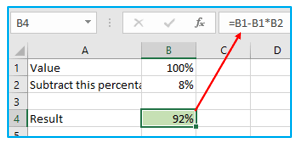
9. Subtract Using Paste Special:
Additionally, you may subtract in Excel by using the Paste Special technique.
When you need to quickly remove a certain value from a whole column, this is helpful.
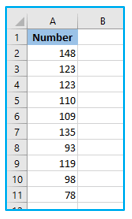
Let’s say you want to deduct 50 from each of the values in the dataset that is depicted below.
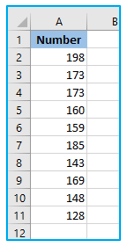
The procedures are as follows:
Step 1: Enter the amount you wish to take away from the entire column in an empty cell. I’ll enter this number in cell D2 in this illustration.
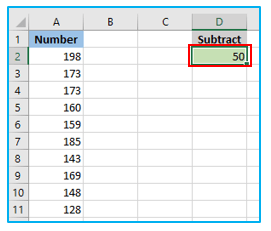
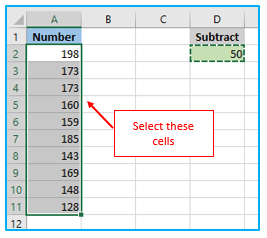
Step 2: By hitting CTRL+C on your keyboard, you can copy cell D2 (the cell where you have entered the value you want to subtract). To subtract the copied value from the column, select the entire column.
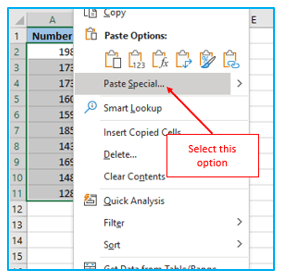
Step 3: To use the Paste Special option, first click the right mouse button.
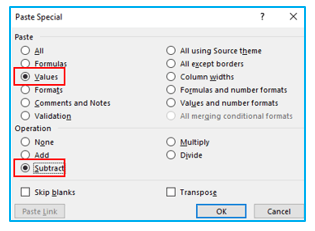
Step 4: Choose “Values” as the option for Paste in the specific dialog box. Select “Subtract” from the “Operations” list. Select OK. You can remove the D1 and D2 cells.
The values you copied from the chosen column were simply subtracted during the aforementioned phases. This yields a static value as a result.
The advantage of this approach is that you do not require a second column where a formula is applied to deduct the values. Create a copy of the column and then follow the instructions above if you want to maintain the original values as well.
Therefore, these are many techniques for subtracting values/percentages, cells, and columns in Excel.
You can utilize the Excel spreadsheet application more effectively if you understand these fundamental ideas.
Application of Subtraction in Excel
- Financial Analysis: Use subtraction in Excel to calculate profit by subtracting expenses from revenue, providing clear insights into financial performance.
- Inventory Management: Track inventory levels by subtracting sold items from total stock, ensuring accurate inventory records and effective stock management.
- Budget Tracking: Monitor budget variance by subtracting actual spending from planned budgets, helping to control costs and manage finances efficiently.
- Date Calculations: Calculate the difference between dates by subtracting one date from another, useful for tracking project durations or employee tenures.
- Data Comparison: Compare values across different time periods or datasets by subtracting one set of numbers from another, facilitating trend analysis and performance evaluation.
- Scorekeeping: Keep track of scores or points in competitions by subtracting points lost from points gained, maintaining accurate and up-to-date results.
For ready-to-use Dashboard Templates:
