Add words to every cell in Excel to customize and enhance the clarity of your data presentation. This technique is invaluable for enriching information, ensuring uniformity, and improving readability across your spreadsheets. Whether you’re preparing data for reports, presentations, or further analysis, adding specific words or phrases can significantly aid in data interpretation and user understanding. Master this skill to elevate the functionality of your Excel worksheets and make your data work harder for you.
- Formula for adding text to the beginning of every cell.
- Apply Ampersand Operator (&)
- How To Add Text After A Specific Character?
- How To Add Text Before A Specific Character?
- How to add certain text or characters to the beginning of a cell?
- What are some common use cases for adding text to cells to every cell in Excel
1. Formula for adding text to the beginning of every cell.
Step 1: First create a dataset with the names of some doctors like the image below.
Written the information here.
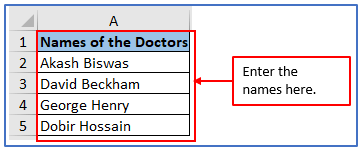
Step 2: Add a column in A1:A5 to get the output there.
A column has been added you can see it below.

Step 3: Type “=con” into the target cell and then select whether to run as CONCAT or CATENATE function. Double click on the selected function. Enter the argument as text you want to add in quotation marks (“”) and select the cell you want to add after it. The formula will be: =CONCATENATE(“Dr.”,A2)
Applied the formula here.

Step 4: After entering the formula press enter.
Here is the output.

Step 5: It’s time to copy this formula into the remaining cells of the column. Just double-click or hold the fill handle and drag it down (located at the bottom right of cell here B2).
Here are all the results.

2. Apply Ampersand Operator (&).
Step 1: Make a dataset with some numbers as shown below.
Placed the numbers here.
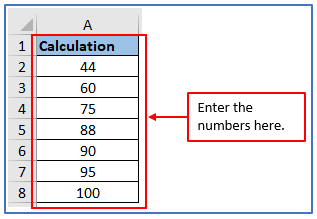
Step 2: Now you need to add the column in A1:A8 to get the Ampersand Operator (&) result there.
Added the column.
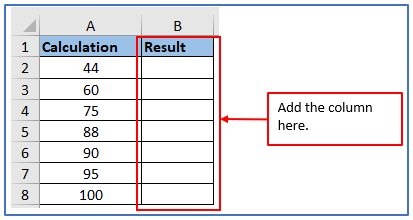
Step 3: Now use the formula. The formula: =A2&”%”
Used the formula here.
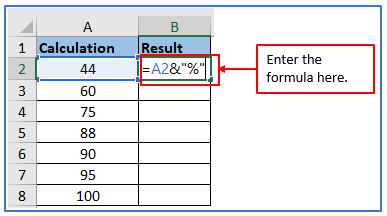
Step 4: Press enter and the result will come out.
Here is the result.
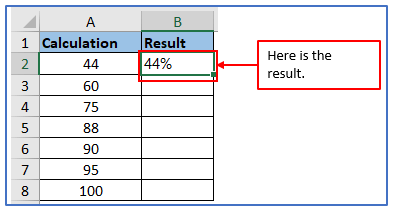
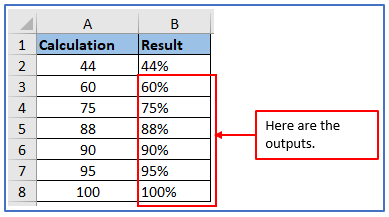
Step 5: Now use the same formula or drag-down the cursor from B2 to get the all outputs.
All the outputs are here.
3. How To Add Text After A Specific Character?
Do make an example like the below picture where have two lists: Employee name and Employee ID.
Step 1: First make a list by writing everyone’s name and their ID then enter that data into the table.
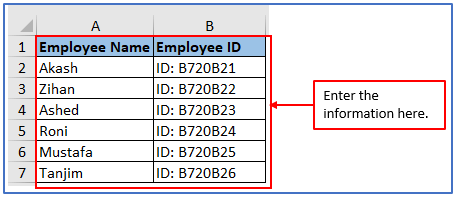
Step 2: Now, make another table starting in cell C1:C7 to get the Employee ID with the Department output there.
The column has been added here.

Step 3: To complete the job description, we need to put the department name and ID before the ID number. One such example is ID-FINANCE-B720B21. This can be accomplished subsequently. Click on a cell in an Excel table where you want to put text after putting the selected character. Use this formula: =LEFT (B2, SEARCH (“-“, B2)) & “FINANCE-” & RIGHT (B2, LEN(B2) – SEARCH(“-“, B2))
Applied the formula here.

Step 4: Press enter and the result will come out. Here is the result after using the formula.
Here is the result.

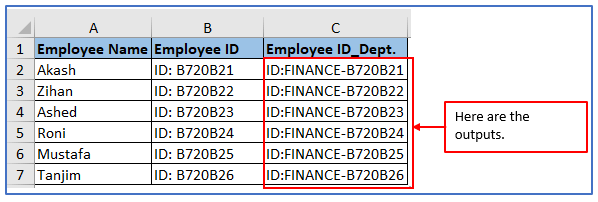
Step 5: Now, use the same formula from Step-3 changing with the column number or drag-down the cursor from C3.
Here are the outputs.
4. How To Add Text Before A Specific Character?
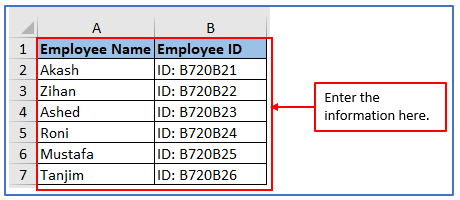
Step 1: First create a dataset like the image.
Entered the information here.
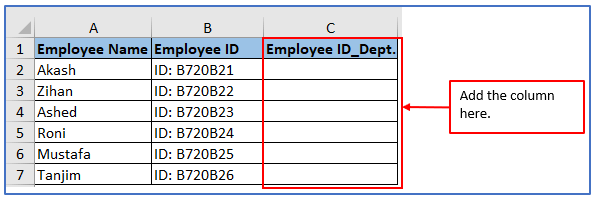
Step 2: Now you need to add the column in B1:B7.
Added the column here.
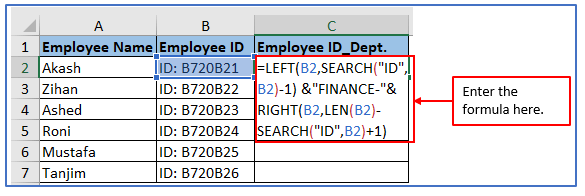
Step 3: Now you want to add the department name before the employee ID. For example FINANCE-ID: B720B21. For this the formula will be: =LEFT(B2,SEARCH(“ID”,B2)-1) &”FINANCE-“&RIGHT(B2,LEN(B2)-SEARCH(“ID”,B2)+1)
Used the formula here.
Step 4: Now, press enter to get the result.
Here is the result.

Step 5: Use the same formula from Step-e or Drag the cursor down from C2 for all cells and you will get Update the formula to display the results.
Here are all the results.

5. How to add certain text or characters to the beginning of a cell?
Step 1: Create a data table following with the information below.
Making a table placed with needed information.

Step 2: Add a column C1:C4 to get the results there and name it result.
Added a column here.

Step 3: Choose a specific cell to exhibit the results and include an equal sign (=) to indicate formulating. Type the desired text using quotation marks (“”) and an ampersand. The formula:
= “Hi ” & A2
Applied the formula here.

Step 4:Ifyouentertheformulainto the ResultscolumnandhitEnter,thetextincolumnAisprecededby“Hi”.
The result is shown below.

Step 5: Like the way above, use the same formula from step-3 with changing column number and you will the result.
You can follow this for the rest of the information. Here are the results.

6. What are some common use cases for adding text to cells to every cell in Excel?
In Excel, adding text to cells can be beneficial in multiple ways. Here are some common use cases:
Labeling data: Using the following examples, you can often use labeling data to identify information in each column and row. Indicating the data type in each column can be done by adding text to the first row of a table that contains sales data, such as “Product Name”, “Sales”, “Costs”, or “Profit”
Notes: In case you possess more information about the data in a cell, please include it as well. Adding information like product name, manufacturer, or SKU to a cell is possible with putting – A note.
Headers and Footers: By adding text to the header or footer of an Excel worksheet, you can identify the purpose of the worksheet and include additional information like the date and author. Incorporating text to cells and other cell types in Excel can facilitate the process of identifying data, creating notes, and providing additional information. By adding text to your Excel sheets in a few simple steps, you can make them more useful and informative.
Application of Index Match Formula in Excel
- Prefix/Suffix Addition: Append or prepend common text to data entries, such as adding currency symbols before financial figures or units after measurements, for clearer data interpretation.
- Labeling for Clarity: Incorporate descriptive labels in cells containing numeric data to specify categories or parameters, like adding “Hours” after time entries or “kg” for weights, enhancing understanding.
- Data Categorization: Add specific words to categorize data more visibly within your spreadsheet, such as marking cells with “Completed,” “Pending,” or “Overdue” to track project statuses.
- Bulk Commenting: Insert explanatory words or phrases in cells across a dataset to provide context or notes directly related to data values, facilitating comprehensive reviews or audits.
- Marketing and Presentation: Enhance presentation tables by adding branding elements like company names or product lines to each cell, ensuring consistent branding across datasets.
- Automated Formatting: Use Excel functions to dynamically add text based on conditions, such as adding “Alert” to entries that exceed a certain threshold, to automatically flag important data points.
You may be interested:
