Introduction to Multiple Selection Drop Down Lists in Excel
What is a Multiple Selection Drop Down List?
A multiple selection drop down list in Excel allows users to select more than one item from a predefined list of options. Unlike a standard drop down list in Excel, where users can only select one item, a multiple selection drop down list enables the selection of multiple items, all of which can appear in the same cell, separated by a delimiter such as a comma or line break. This feature is particularly useful in scenarios where multiple data points are needed from a single list, such as selecting multiple categories for a product or tagging multiple people in a project. Implementing this functionality typically requires the use of VBA (Visual Basic for Applications) to enhance Excel’s default data validation options.
Benefits of Using a Multiple Selection Drop Down List in Excel
Using a multiple selection drop down list in Excel provides significant advantages, especially in data-heavy environments. One of the primary benefits is the ability to streamline data entry by allowing users to select multiple items from a list, thereby reducing the chances of errors and ensuring consistency. This type of list is also more user-friendly compared to manually typing each selection, especially when dealing with long lists of options. Additionally, it improves data organization by consolidating multiple selections into a single cell, which can be particularly useful in reporting and analysis. For example, in a project management spreadsheet, allowing for multiple selections in a drop-down list can help track which team members are assigned to multiple tasks or roles, ensuring all data is captured efficiently.
Step-by-Step Guide to Creating a Multiple Selection Drop Down List to Select Multiple Items
Preparing Your Data for the Drop Down List with Multiple Selection
Before creating drop-down list with multiple selection, it is crucial to prepare your data properly. Start by compiling a list of options that will be available in the drop-down menu, ensuring that all entries are unique and relevant. This list can be placed in a separate worksheet or within the same sheet where the drop-down list will be used. The data should be organized in a single column without any blank cells, as these will be used for data validation list. Preparing your data in this manner is essential for ensuring that the drop-down list functions correctly and that all possible selections are available to users.
Creating a Standard Drop Down List in Excel
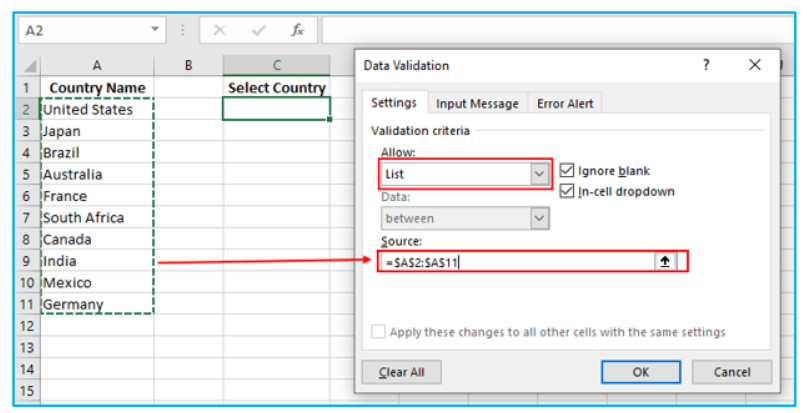
To create a drop-down list in Excel, begin by selecting the cell where you want the list to appear. Then, go to the Data tab and click on “Data Validation.” In the dialog box that appears, choose “List” from the “Allow” drop-down menu, and then specify the range where your list of options is located. This will create a basic drop-down list in Excel, allowing users to select one item from the predefined list. While this setup only allows for a single selection, it forms the foundation upon which you can build a multiple selection drop down list using VBA. This initial step is critical, as it ensures that the basic functionality is in place before adding more complex features.
Using VBA to Allow Multiple Selections in a Drop-Down List
Enabling multiple selections in Excel drop-down list requires the use of VBA (Visual Basic for Applications). VBA allows you to create a custom code that modifies the default behavior of Excel’s data validation feature, enabling users to select multiple items in a drop-down list. The VBA code typically involves scripting an event handler for the worksheet that captures each selection and appends it to the cell’s current contents, separated by a delimiter like a comma or a line break. This process transforms the standard drop down list into one that supports multiple selections, making it a powerful tool for data entry and management.
Writing the VBA Code to Enable Multiple Selections
To write the VBA code for enabling multiple selections, open the Visual Basic for Applications editor by pressing Alt + F11 in Excel. Insert a new module and paste the following code:
Private Sub Worksheet_Change(ByVal Target As Range)
Dim OldValue As String
Dim NewValue As String
On Error GoTo ExitHandler
If Target.Address = “$B$2” Then
Application.EnableEvents = False
NewValue = Target.Value
Application.Undo
OldValue = Target.Value
Target.Value = OldValue & “, ” & NewValue
End If
ExitHandler:
Application.EnableEvents = True
Exit Sub
End Sub
This code allows users to select multiple items in cell B2. Each new selection is appended to the previous ones, separated by a comma. You can modify the cell reference and delimiter according to your needs. The code is designed to handle multiple selections in a drop-down list effectively, allowing for flexible data entry in Excel.
How to Apply the VBA Code to Your Excel Spreadsheet
After writing the VBA code, you need to apply it to the desired worksheet. Close the VBA editor and return to your Excel spreadsheet. The VBA code is now active, and the drop down list will allow multiple selections in the specified cell. To use the code in different cells or across multiple worksheets, simply adjust the cell reference in the code. Remember to save your workbook as a macro-enabled file (.xlsm) to ensure that the VBA code is preserved and functions correctly. This step is crucial for enabling the multiple selection functionality in your Excel drop down list.
Testing Your Multiple Selection Excel Drop Down List
Once the VBA code is applied, it’s important to test your multiple selection drop down list to ensure it works as expected. Start by clicking on the cell with the drop down list and selecting multiple items. Verify that each selected item appears in the cell, separated by the designated delimiter. Additionally, test the list to make sure that it handles a large number of selections and that the VBA code does not cause any errors or unexpected behavior. Testing is a critical step in the implementation process, as it ensures that the drop down list functions smoothly and meets your data entry needs.
Troubleshooting Common Issues with Multiple Selections
When working with multiple selections in a drop down list, you may encounter some common issues. For example, the VBA code might not function if the worksheet’s settings are not configured correctly, or if there are conflicts with other macros. Additionally, you may notice that the selected items do not appear correctly if the delimiter is not set up properly in the code. To troubleshoot these issues, double-check the VBA code for accuracy, ensure that macros are enabled in your Excel settings, and review the data validation rules applied to the drop down list. Troubleshooting these common problems will help ensure that your multiple selection drop down list works efficiently.
Tips and Tricks for Managing Drop Down with Multiple Selections
Best Practices for Using Multiple Selections in Excel
When using multiple selection drop down lists in Excel, it’s essential to follow best practices to ensure optimal functionality. One key practice to create drop down list, is to keep your list of options concise and relevant, as a lengthy list can become cumbersome for users. Additionally, consider using clear and consistent delimiters, such as commas or line breaks, to separate selected items within the cell of Microsoft Excel. This improves readability and makes data analysis easier. Another best practice is to regularly test your VBA code to ensure it continues to work as expected, especially after making changes to the spreadsheet. By adhering to these best practices, you can create effective and user-friendly multiple selection drop down lists in Excel.
You may be interested: